This guide assumes you have read Part 1 of the guide and/or installed your anti interference board. It also assumes you have read Part 2 of the guide and/or have installed and configured the H3-3D gimbal onto the Phantom 2.  We shall be installing a 5.8Ghz video transmitter for FPV, a DJI Mini iOSD for telemetry, an FPV hub and the associated wiring that will make the whole process plug and play. We shall be configuring it all for use with a 7inch monitor, a Flysight Black Pearl with Diversity 5.8ghz receiver.
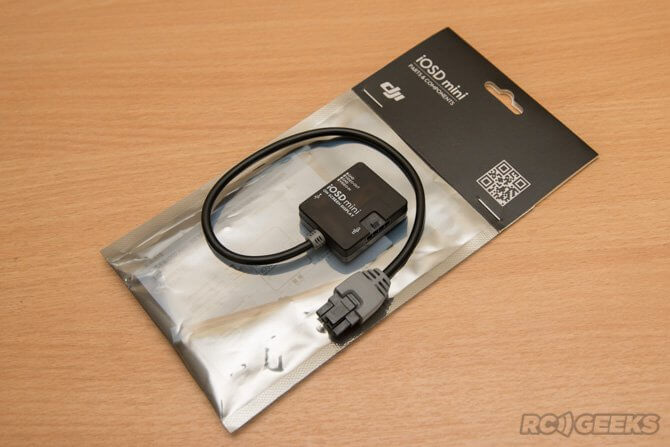
  Unwrapping the iOSD Mini, we will only need the device itself with the moulded CAN-bus lead. The Mini iOSD is a great tool for flying FPV. It enables a telemetry overlay onto the video feed giving you plenty of information on battery life, home location relative to craft, flight direction speed and more. This is extremely useful when flying with the gimbal pointing down and a pair of FPV goggles on. The video overlay information looks like this, and the information breakdown can be seen here.
  The FPV hub is a small postage-stamp sized circuit board and cable combination that allows quick plug and play connection for several other DJI Innovations parts. It comes with cables for connecting an AVL58 transmitter, generic FPV transmitter and an iOSD. Since we are setting up the entire system for iOSD overlay, go ahead and check that the switch on the side is set to ‘OSD’. We are only interested in the cables for the Zenmuse gimbal (grey 8-pin latched) and the Mini-iOSD (grey 4-pin) and the 3m sticky pads to affix our equipment to the bottom of the craft.
  Our new FPV transmitters come with SMA antennas, manuals and generic power and video cabling. They have also been ordered with several new cables to assist the installation to DJI Phantom craft.
  Firstly this three-connector cable. It is designed to plug into the 6-pin CAM connector on the mainboard of the Phantom and then connect to the power and video plugs on the transmitter
  Secondly this four-connector cable. It is designed to plug into the 6-pin CAM connector on the mainboard, the power/video plugs on the transmitter and stop off at the Mini iOSD to overlay the telemetry on the way.
  Finally this three-connector cable. It connects the FPV VTX port with the power and video plugs on the transmitter. It’s important to note that these cables are designed only for these transmitters. The popular FatShark/ImmersionRC transmitters have their power/ground cables reversed and also their video ground cables in different locations. The upshot is that if you connected one of these transmitters to the craft/FPV hub using a cable without alteration you may damage your equipment.
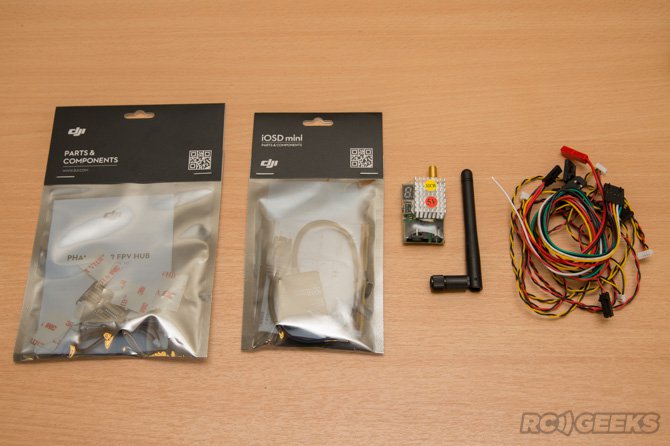
  Putting the rest of the equipment aside, you should be left with a video transmitter and antenna, the FPVHub to video transmitter custom cable, the FPVHub to Zenmuse gimbal 8-pin wire, the FPVHub to Mini iOSD 4-pin wire, the iOSD mini and the 3M sticky pads.
  Connecting them together is fairly fool proof, each cable (with the exception of the short, levered 8-pin cable, which should be plugged into the levered slot) will only fit in one socket.
  Here is a close up showing how everything will be connected on the craft. Once you are familiar with the system, unplug it all and you are ready to install it.
  The following is just a suggestion for component placing and is not the only way of installing the hardware. Now we can start adding the components to the craft. With the Phantom upside down and the rear of the craft facing you, attach the FPV hub close to the base of the gimbal.
  Next plug in the 4-pin grey cable to the iOSD Mini and the FPV Hub. We prefer to install the iOSD face down allowing access to the rear CAN-Bus cable for later installation of other components such as the 2.4Ghz Datalink. Ensure you leave enough space behind the gimbal for it to move on its dampers and not come into contact with the Mini iOSD.
  The Mini iOSD needs to connect to the flight controller to gain access to the flight data. With the Mini iOSD mounted you can run the cable up and along the leg (taping it along the way) before plugging it into the front left leg CAN-Bus port.
  Lastly we add the video transmitter. Screw the supplied SMA antenna into the end of the transmitter before sticking it down to ensure you have enough space. Avoid powering up the transmitter without an antenna connected. Connect the supplied cable to the video and power plugs on the transmitter before connecting the other end to the VTX port on the FPV Hub.
  Finally tidy up the excess cable with a tie. Here is another shot showing the completed craft setup.
  Our Black Pearl monitors come with a whole host of cables in the box but we are only interested in the screen, the sun shade, the antenna and the manual. It’s worth having a flick through the manual to understand how the front buttons work as it can be confusing to a first time user, the power button activates the menu and the M button enters a setting.
  The sun shade comes in 3 parts and simply clips into the side and top of the monitor as well as itself. The supplied SMA antennas just screw right on. You will need to change the band on the Black Pearl monitor to get it to communicate with the video transmitter.
  Fire up the Phantom as you usually would. The video transmitter should power up and display which channel it is broadcasting on. Check which band the transmitter is broadcasting on by pressing and holding the channel button on the side, the LCD will relay the information. Then enter the Black Pearl monitor and change the diversity band (RF>Diversity band) to match that. Finally scroll through the channels on the Black Pearl (by using the up and down arrows when in the DIVERSITY mode) until you find a picture.
  Your FPV setup is complete! You may find the GoPro overlays interfere with the Mini iOSD overlays (as seen in the above photo) so we suggest you turn off the GoPro overlays using the GoPro menu. Before flight, ensure that the GoPro Wi-Fi is DISABLED as it has the potential to cause interference with the Phantom’s control system.
  Troubleshooting: Should you get a picture up on the Black Pearl monitor that is black and white/stretching banding and moving, try switching video mode (Function>VideoSystem) from PAL to NTSC and vice versa. If you cannot find the VideoSystem setting under Function you may not have scrolled far enough down the menu. If you find the monitor is tuning in (black screen) but not displaying an image, check all the connections on your FPV Hub and also the CAN-Bus port on the Phantom leg.
 We shall be installing a 5.8Ghz video transmitter for FPV, a DJI Mini iOSD for telemetry, an FPV hub and the associated wiring that will make the whole process plug and play. We shall be configuring it all for use with a 7inch monitor, a Flysight Black Pearl with Diversity 5.8ghz receiver.
  Unwrapping the iOSD Mini, we will only need the device itself with the moulded CAN-bus lead. The Mini iOSD is a great tool for flying FPV. It enables a telemetry overlay onto the video feed giving you plenty of information on battery life, home location relative to craft, flight direction speed and more. This is extremely useful when flying with the gimbal pointing down and a pair of FPV goggles on. The video overlay information looks like this, and the information breakdown can be seen here.
  The FPV hub is a small postage-stamp sized circuit board and cable combination that allows quick plug and play connection for several other DJI Innovations parts. It comes with cables for connecting an AVL58 transmitter, generic FPV transmitter and an iOSD. Since we are setting up the entire system for iOSD overlay, go ahead and check that the switch on the side is set to ‘OSD’. We are only interested in the cables for the Zenmuse gimbal (grey 8-pin latched) and the Mini-iOSD (grey 4-pin) and the 3m sticky pads to affix our equipment to the bottom of the craft.
  Our new FPV transmitters come with SMA antennas, manuals and generic power and video cabling. They have also been ordered with several new cables to assist the installation to DJI Phantom craft.
  Firstly this three-connector cable. It is designed to plug into the 6-pin CAM connector on the mainboard of the Phantom and then connect to the power and video plugs on the transmitter
  Secondly this four-connector cable. It is designed to plug into the 6-pin CAM connector on the mainboard, the power/video plugs on the transmitter and stop off at the Mini iOSD to overlay the telemetry on the way.
  Finally this three-connector cable. It connects the FPV VTX port with the power and video plugs on the transmitter. It’s important to note that these cables are designed only for these transmitters. The popular FatShark/ImmersionRC transmitters have their power/ground cables reversed and also their video ground cables in different locations. The upshot is that if you connected one of these transmitters to the craft/FPV hub using a cable without alteration you may damage your equipment.
  Putting the rest of the equipment aside, you should be left with a video transmitter and antenna, the FPVHub to video transmitter custom cable, the FPVHub to Zenmuse gimbal 8-pin wire, the FPVHub to Mini iOSD 4-pin wire, the iOSD mini and the 3M sticky pads.
  Connecting them together is fairly fool proof, each cable (with the exception of the short, levered 8-pin cable, which should be plugged into the levered slot) will only fit in one socket.
  Here is a close up showing how everything will be connected on the craft. Once you are familiar with the system, unplug it all and you are ready to install it.
  The following is just a suggestion for component placing and is not the only way of installing the hardware. Now we can start adding the components to the craft. With the Phantom upside down and the rear of the craft facing you, attach the FPV hub close to the base of the gimbal.
  Next plug in the 4-pin grey cable to the iOSD Mini and the FPV Hub. We prefer to install the iOSD face down allowing access to the rear CAN-Bus cable for later installation of other components such as the 2.4Ghz Datalink. Ensure you leave enough space behind the gimbal for it to move on its dampers and not come into contact with the Mini iOSD.
  The Mini iOSD needs to connect to the flight controller to gain access to the flight data. With the Mini iOSD mounted you can run the cable up and along the leg (taping it along the way) before plugging it into the front left leg CAN-Bus port.
  Lastly we add the video transmitter. Screw the supplied SMA antenna into the end of the transmitter before sticking it down to ensure you have enough space. Avoid powering up the transmitter without an antenna connected. Connect the supplied cable to the video and power plugs on the transmitter before connecting the other end to the VTX port on the FPV Hub.
  Finally tidy up the excess cable with a tie. Here is another shot showing the completed craft setup.
  Our Black Pearl monitors come with a whole host of cables in the box but we are only interested in the screen, the sun shade, the antenna and the manual. It’s worth having a flick through the manual to understand how the front buttons work as it can be confusing to a first time user, the power button activates the menu and the M button enters a setting.
  The sun shade comes in 3 parts and simply clips into the side and top of the monitor as well as itself. The supplied SMA antennas just screw right on. You will need to change the band on the Black Pearl monitor to get it to communicate with the video transmitter.
  Fire up the Phantom as you usually would. The video transmitter should power up and display which channel it is broadcasting on. Check which band the transmitter is broadcasting on by pressing and holding the channel button on the side, the LCD will relay the information. Then enter the Black Pearl monitor and change the diversity band (RF>Diversity band) to match that. Finally scroll through the channels on the Black Pearl (by using the up and down arrows when in the DIVERSITY mode) until you find a picture.
  Your FPV setup is complete! You may find the GoPro overlays interfere with the Mini iOSD overlays (as seen in the above photo) so we suggest you turn off the GoPro overlays using the GoPro menu. Before flight, ensure that the GoPro Wi-Fi is DISABLED as it has the potential to cause interference with the Phantom’s control system.
  Troubleshooting: Should you get a picture up on the Black Pearl monitor that is black and white/stretching banding and moving, try switching video mode (Function>VideoSystem) from PAL to NTSC and vice versa. If you cannot find the VideoSystem setting under Function you may not have scrolled far enough down the menu. If you find the monitor is tuning in (black screen) but not displaying an image, check all the connections on your FPV Hub and also the CAN-Bus port on the Phantom leg.
-

-

-

-

-

-
-

-

-

-
-
-

-

-

-

-

-

-

-

-

-

-

-
 reviews
Axial SCX10 II Jeep Cherokee Scale Crawler Review : Does it live up to its reputa...
Tom Begley | -

-

-

-

-

-

-

-

-

-

-

-

-

-

-

-

-

-

-

-

-

-

-
 tutorial
Mavic 2 & DJI Goggles : The ultimate pairing in filming, inspections & surveys
Tom Begley | -

-

-

-

-

-

-

-

-

-

-

-

-

-

-

-

-

-

-
 reviews
FrSKY's Taranis Q X7 Transmitter - A budget alternative to the Taranis Plus X9D?
Tom Begley | -

-

-

-

-

-

-

-

-

-

-

-

-

-

-

-

-

-

-

-

-

-

-

-

-

-

-

-

-

-

-

-

-

-

-

-

-

-

-

-

-

-


