Ever since last week's launch, we have been desperate to get hands-on, for a DJI Phantom 4 unboxing and first-look. The new drone promised to bring some incredible technology and cement the Phantom as the leading consumer quadcopter. As a leading UK dealer of their products, DJI have kindly provided us a pre-release model ahead of next week's release, intended for customer education and staff training. As such, please note that there may be a few differences in packaging or configuration compared to the retail drone that we will be supplying. This blog will concentrate more on the hardware and the presentation of the DJI Phantom 4. If you are looking for more information or for videos of it flying, you can find out more on our product page.
 Some hints of what is in-store inside can be found on the side. Highlights include object avoidance, tapfly, activetrack, sport mode and mode. DJI also touch on the outcomes of their optimisation with the 28 minute flight time.
  A proper rubber handle protrudes from box, this is actually integral to the inner case.
  With the box vertical, flipping open the lid reveals the new inner packaging. These inner flaps simply fold out of the way.
 The polystyrene is sealed to prevent flaking and embossed with DJI and Phantom logos as we have tried to depict below.
  lift the instruction sticker via the small black tab and then the two halves will swing apart via the plastic hinge at the base.
  To us it feels like the insert of the last generation carry case, perhaps DJI will offer a hard outer-shell to offer more robust protection and weatherproofing? Flipping the lid you are greeted by a custom cut polystyrene interior with two distinct spaces for extra batteries alongside the drone, charger, data cables, transmitter, propellers and supporting documentation.
 Everything in the box, laid out still individually sealed.
  The Phantom 4 comes with the standard documentation, a disclaimer and safety pamphlet, a leaflet on safely using the intelligent battery, an in the box checklist and finally the quick start guide. DJI prefer to host the full manual as a PDF online to ensure it accurately reflects any future updates brought by updated firmware.
  Our model being a north american pre-release one, it also included extra multi-lingual manuals and also a document from the FAA. As ever, the in-the-box checklist in full:
 The Phantom range has had some big design revisions leading to the refined, aerodynamic, highly polished drone you see before you.
  Our chassis had the model designation WM330 and features the new magnesium 'core' which reportedly reduces internal vibrations increasing the accuracy of the paired IMU's.
 To remove the clamp, rotate it around one of the landing legs, un-clipping it from the opposite leg at the same time.
  Then release the opposite leg, freeing the camera from its cup.
  Note the grooves in the rubber landing strips for locating the gimbal clamp when re-installing it. Placing it too far forward or back will put undue stress on the gimbal and dampers.
  Removed from the craft the gimbal clamp looks like this.
  Remember to remove the protective lens film before your first flight, it just peels off as does the plastic film on the upper gimbal motor.
 Its a 100w charger running 17.4 volts. Our model came with a USA-spec wall plug, but the power supply unit accepts the common 'figure-8' 2-pin connector so a suitable cable was easily sourced.
  DJI have finally given up on the sprung-pin battery connector that has proved problematic in the past and moved to a new 10-pin design as seen below.
 As seen earlier, the new cell has the connector recessed into a pocket on the bottom of the casing. It also has clips top and bottom that retain it when installed.
  The battery also has ventilation holes between the layers themselves to aid cooling. Its a clever bit of design that will potentially passively cool the battery quicker when out of the craft. Note the message ensuring the ventilation holes are free from obstructions below.
  Originally we wondered if there was a fan to blow air across the battery in flight but there is little evidence of this inside the craft.
  In fact the new design appears to be quite tightly packaged with internal reinforcing.
 To remove, simply squeezing the tabs top and bottom before pulling it out.
 As with the Phantom 3, the Phantom 4 comes with four pairs of props, giving the owner two full sets.
  Each of the props comes factory sealed. We suggest leaving the seals on until they are used to differentiate between your new and used propellers.
 As per the warning on the arm stickers, ensure that the propeller is securely installed before flying. Match black ring propellers with motors with black dots.
  Match the band around the propeller cap to the motors. The black band on the propeller above should be fitted to the motor with the black dots on its cap shown below. It should not be possible to mismatch the propeller and motors.
  Using one hand to hold the silver motor body in place, put the prop on top of the motor spindle and rotate it (clockwise for silver props, anti-clockwise for black props) around one-sixth of a turn whilst applying a tiny amount of downward pressure. You will feel the prop 'snap' into place if it has been done correctly.
  Its impossible to get the incorrect propeller to lock-on to the wrong motor. You can test that the props are locked on correctly by turning the propeller from the end of the blade and looking to see if the motor cap rotates.
 The arm design has been simplified with what appear to be air vents where the LEDs used to be. The indicator lights have been reduced to one bright LED, mounted behind a lens beneath each motor. These light up in flight to indicate the orientation of the craft when flying line of sight.
  The changes continue under the belly of the craft. Previously the camera and gimbal have been mounted on anti-vibration mounts, hung from a metal plate on the base of the drone. The basic VPS system of the Phantom 3 was also a separate module screwed into the bottom of the craft. DJI have now integrated the systems into the composite body, with a pair of down facing cameras complementing the large downward facing ultrasonic mounted directly to the shell. The camera gimbal now appears to hang from a dampened mount hidden inside the craft
  DJI have been promoting the obstacle avoidance of this new model. Its abilities for sensing have been expanded by stereo front facing cameras, on the body just above the legs. Their effective range is 2-49 feet (~70cm to 15m) and they can detect any patterned surface (such as foliage) assuming adequate lighting.
  The camera gimbal is improved too. The camera axis is now supported on both sides to aid stability and then entire gimbal and camera shell is has been made out of a composite with a matt grey powdercoat finish
  The combined gimbal-casing has meant the memory card slot and USB port have been relocated into the body of the craft. Its great to see DJI still include a fast 16GB micro SD memory card to allow you to shoot and film right away. The maximum supported card is currently a 64GB one with Class 10 or UHS-1 rating.
 In stills mode it creates JPEG's or DNG (RAW) up to 4000×3000px. There are various options for still shooting including single shot, burst shooting, auto exposure bracketing, time-lapse and even HDR if that is your thing. The sensitivity ramps up from 100 all the way to ISO 1600. In video mode it produces MP4 / MOV files (MPEG – 4 AVC / H.264 codecs) with a maximum video bitrate of 60Mbps. These can be captured at UHD (4096×2160) 4K @25fps right down to FHD (1920x1080) @120fps. Its worth nothing that the FOV changes at this high frame rate, also that it will shoot @720p but only at a max of 60fps. When filming the ISO can be expanded out to 3200.
 Its a twin stick digital transmitter with additional buttons and dials for adjusting flight modes and operating the on-board camera and gimbal.
  The rear features two buttons that are programmable via the app.
  Pairing the twin antennas with the advanced Lightbridge technology, the transmitter has an effective range of up to 3.1miles (5km) in FCC mode or 2.2miles (3.5km) in UK-friendly CE mode. These figures are best case scenario in an unobstructed area free of interference.
  To give you an idea of scale of the transmitter, that's a 5.8 inch 'wide' Nexus 5X Android phone sat in the device holder.
  Below the sticks on the face of the transmitter are the power and return-to-home buttons along with battery indicator LEDs.
  Alongside the camera settings (default exposure adjustment) dial is the flight mode switch. Note that DJI now include a sticker referring you to the manual before switching modes.
  The C1 does not natively feature a HDMI out, but as with the Phantom 3 transmitter, an additional adapter can be bought to enable this. It does retain the USB plug, used to connect your mobile device to the controller, essential for piloting the craft.
  The transmitter has an internal 6000 mAh 2cell LiPo battery. It is charged via a DC power jack under a rubber cover on the right hand side.
 To recap, you are provided the drone & battery, two full sets of props, charger, usb cable and OTG adapter, transmitter and documentation.
 Now we have finally got 'hands-on' with the drone, we feel the Phantom 4 is a huge step forward in terms of materials and build-quality alone!
  You can watch videos of the craft in action, see further specs or learn about the cost on our product listing page here. If you have any specific questions regarding this Phantom 4 unboxing, especially pertaining to the hardware or setup, leave us a comment below or call us on 01737 457404 and we will endeavor to help!
Phantom 4 Outer Packaging
DJI have continued their trend of silk finish white boxes but have opted for a gloss varnish over the craft artwork on the outer box. This has the premium feel required to match the pricetag. Overall its roughly the same dimensions as the outgoing Phantom 3 packaging. Some hints of what is in-store inside can be found on the side. Highlights include object avoidance, tapfly, activetrack, sport mode and mode. DJI also touch on the outcomes of their optimisation with the 28 minute flight time.
  A proper rubber handle protrudes from box, this is actually integral to the inner case.
  With the box vertical, flipping open the lid reveals the new inner packaging. These inner flaps simply fold out of the way.
Integral Carrying Case
Spending over £1000 on a drone that arrived in an cardboard egg-box never felt right, we commend DJI in their advancements in reusable packaging. With the outer box removed you are left with a polystyrene carry case complete with metal securing latch. The polystyrene is sealed to prevent flaking and embossed with DJI and Phantom logos as we have tried to depict below.
  lift the instruction sticker via the small black tab and then the two halves will swing apart via the plastic hinge at the base.
  To us it feels like the insert of the last generation carry case, perhaps DJI will offer a hard outer-shell to offer more robust protection and weatherproofing? Flipping the lid you are greeted by a custom cut polystyrene interior with two distinct spaces for extra batteries alongside the drone, charger, data cables, transmitter, propellers and supporting documentation.
Phantom 4 Unboxing - Contents
The box contains the drone itself, remote controller, propeller pairs x4 in drawstring bag, intelligent flight battery, battery charger, power cable, manuals. It also includes a few accessories including a transportation gimbal clamp, USB OTG cable, Micro USB cable and a 16GB Micro SD card. Everything in the box, laid out still individually sealed.
  The Phantom 4 comes with the standard documentation, a disclaimer and safety pamphlet, a leaflet on safely using the intelligent battery, an in the box checklist and finally the quick start guide. DJI prefer to host the full manual as a PDF online to ensure it accurately reflects any future updates brought by updated firmware.
  Our model being a north american pre-release one, it also included extra multi-lingual manuals and also a document from the FAA. As ever, the in-the-box checklist in full:
All-new Phantom 4 Drone
Fresh out of the box, the all-new drone looks like this. The Phantom range has had some big design revisions leading to the refined, aerodynamic, highly polished drone you see before you.
  Our chassis had the model designation WM330 and features the new magnesium 'core' which reportedly reduces internal vibrations increasing the accuracy of the paired IMU's.
New gimbal clamp
When transporting the Phantom its important to ensure the gimbal is restrained as to not put undue stress on the hardware. Previous generations of Phantom have had various solutions to this, but this is the most graceful solution by far. To remove the clamp, rotate it around one of the landing legs, un-clipping it from the opposite leg at the same time.
  Then release the opposite leg, freeing the camera from its cup.
  Note the grooves in the rubber landing strips for locating the gimbal clamp when re-installing it. Placing it too far forward or back will put undue stress on the gimbal and dampers.
  Removed from the craft the gimbal clamp looks like this.
  Remember to remove the protective lens film before your first flight, it just peels off as does the plastic film on the upper gimbal motor.
Phantom 4 cables and charger
DJI supply a 4ft USB to mico-usb cable for updating the craft and a short OTG usb adapter alongside charging hardware. Its a 100w charger running 17.4 volts. Our model came with a USA-spec wall plug, but the power supply unit accepts the common 'figure-8' 2-pin connector so a suitable cable was easily sourced.
 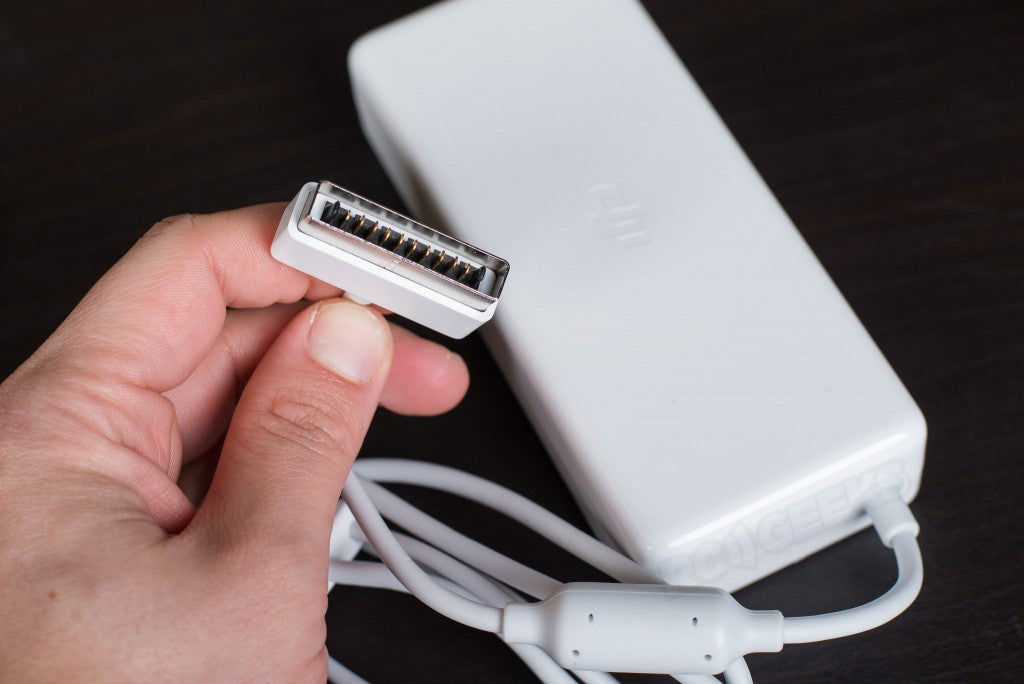 DJI have finally given up on the sprung-pin battery connector that has proved problematic in the past and moved to a new 10-pin design as seen below.
New Intelligent Flight Battery
On a quest to improve efficiency, balance and just package all that tech into a small frame, DJI have totally redesigned the intelligent flight battery. The 4 cell 15.2V 5350mAh LiPo is shorter and wider than the outgoing 4S Phantom 3 battery. It still acts as the master power switch for the craft, retaining both the power button and the led power level indicators. As seen earlier, the new cell has the connector recessed into a pocket on the bottom of the casing. It also has clips top and bottom that retain it when installed.
  The battery also has ventilation holes between the layers themselves to aid cooling. Its a clever bit of design that will potentially passively cool the battery quicker when out of the craft. Note the message ensuring the ventilation holes are free from obstructions below.
  Originally we wondered if there was a fan to blow air across the battery in flight but there is little evidence of this inside the craft.
  In fact the new design appears to be quite tightly packaged with internal reinforcing.
Installing the battery
The new, wider, slimmer battery slides in the rear of the craft with little resistance compared to the older Phantom craft. To remove, simply squeezing the tabs top and bottom before pulling it out.
All-new twist on propellers
Another big change is the migration from threaded props to twist-on ones, working in a similar fashion to those found on the Inspire 1. As with the Phantom 3, the Phantom 4 comes with four pairs of props, giving the owner two full sets.
  Each of the props comes factory sealed. We suggest leaving the seals on until they are used to differentiate between your new and used propellers.
Fitting Phantom 4 propellers
 As per the warning on the arm stickers, ensure that the propeller is securely installed before flying. Match black ring propellers with motors with black dots.
  Match the band around the propeller cap to the motors. The black band on the propeller above should be fitted to the motor with the black dots on its cap shown below. It should not be possible to mismatch the propeller and motors.
 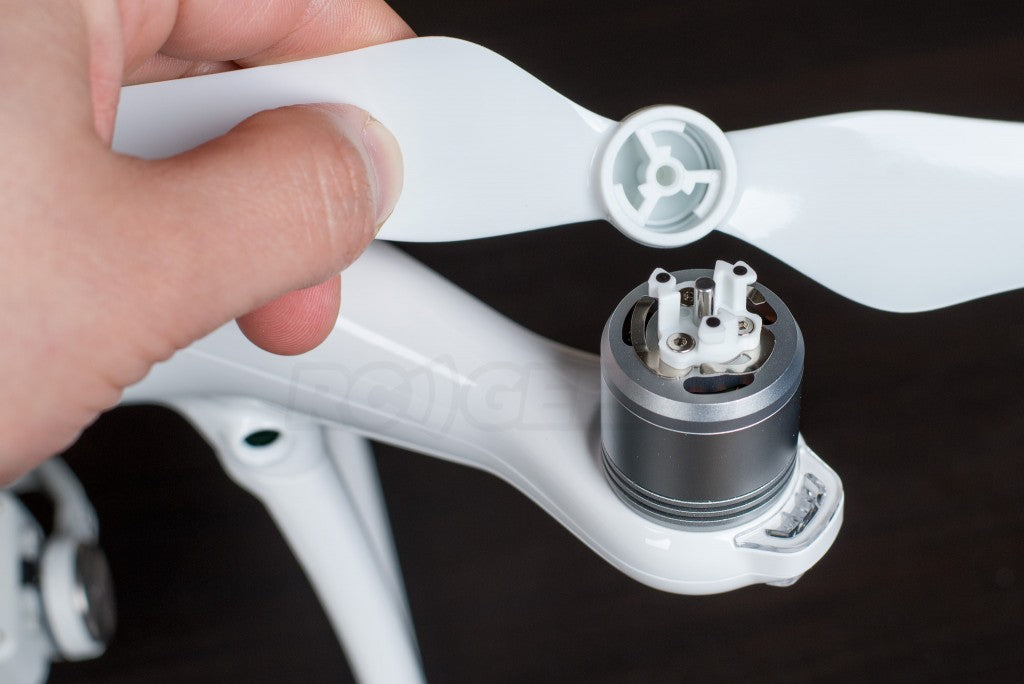 Using one hand to hold the silver motor body in place, put the prop on top of the motor spindle and rotate it (clockwise for silver props, anti-clockwise for black props) around one-sixth of a turn whilst applying a tiny amount of downward pressure. You will feel the prop 'snap' into place if it has been done correctly.
  Its impossible to get the incorrect propeller to lock-on to the wrong motor. You can test that the props are locked on correctly by turning the propeller from the end of the blade and looking to see if the motor cap rotates.
Other revisions to the Phantom 4
The motors have been modified, now in a casing that sits on-top of the chassis instead of deep into it to aid cooling and potentially increase prop. The screw threads have been replaced with a twist-catch design to simplify propeller mounting. The motors splay outwards slightly and also canter backwards/forwards into the centre midpoint of the frame. All of the advancements equate in a craft capable of 44.7mph in sport mode. The arm design has been simplified with what appear to be air vents where the LEDs used to be. The indicator lights have been reduced to one bright LED, mounted behind a lens beneath each motor. These light up in flight to indicate the orientation of the craft when flying line of sight.
  The changes continue under the belly of the craft. Previously the camera and gimbal have been mounted on anti-vibration mounts, hung from a metal plate on the base of the drone. The basic VPS system of the Phantom 3 was also a separate module screwed into the bottom of the craft. DJI have now integrated the systems into the composite body, with a pair of down facing cameras complementing the large downward facing ultrasonic mounted directly to the shell. The camera gimbal now appears to hang from a dampened mount hidden inside the craft
  DJI have been promoting the obstacle avoidance of this new model. Its abilities for sensing have been expanded by stereo front facing cameras, on the body just above the legs. Their effective range is 2-49 feet (~70cm to 15m) and they can detect any patterned surface (such as foliage) assuming adequate lighting.
  The camera gimbal is improved too. The camera axis is now supported on both sides to aid stability and then entire gimbal and camera shell is has been made out of a composite with a matt grey powdercoat finish
  The combined gimbal-casing has meant the memory card slot and USB port have been relocated into the body of the craft. Its great to see DJI still include a fast 16GB micro SD memory card to allow you to shoot and film right away. The maximum supported card is currently a 64GB one with Class 10 or UHS-1 rating.
Revised Camera
The Phantom 4 camera has been improved in terms of image quality. The new 8-element lens reduces chromatic aberration by 56% and lens distortion reduced by 36% when put compared to the Phantom 3 Pro. It is a 20mm ( 35mm equivalent ) f/2.8 lens with a 94° Field Of View and it sits above the 1/2.3” 12MP sensor. In stills mode it creates JPEG's or DNG (RAW) up to 4000×3000px. There are various options for still shooting including single shot, burst shooting, auto exposure bracketing, time-lapse and even HDR if that is your thing. The sensitivity ramps up from 100 all the way to ISO 1600. In video mode it produces MP4 / MOV files (MPEG – 4 AVC / H.264 codecs) with a maximum video bitrate of 60Mbps. These can be captured at UHD (4096×2160) 4K @25fps right down to FHD (1920x1080) @120fps. Its worth nothing that the FOV changes at this high frame rate, also that it will shoot @720p but only at a max of 60fps. When filming the ISO can be expanded out to 3200.
Phantom 4 Transmitter - Much of the same
If you have flown a Phantom 3 Adv/Pro or an Inspire 1 you will be familiar with the C1 transmitter bundled with the Phantom 4. Its a twin stick digital transmitter with additional buttons and dials for adjusting flight modes and operating the on-board camera and gimbal.
  The rear features two buttons that are programmable via the app.
  Pairing the twin antennas with the advanced Lightbridge technology, the transmitter has an effective range of up to 3.1miles (5km) in FCC mode or 2.2miles (3.5km) in UK-friendly CE mode. These figures are best case scenario in an unobstructed area free of interference.
  To give you an idea of scale of the transmitter, that's a 5.8 inch 'wide' Nexus 5X Android phone sat in the device holder.
  Below the sticks on the face of the transmitter are the power and return-to-home buttons along with battery indicator LEDs.
  Alongside the camera settings (default exposure adjustment) dial is the flight mode switch. Note that DJI now include a sticker referring you to the manual before switching modes.
  The C1 does not natively feature a HDMI out, but as with the Phantom 3 transmitter, an additional adapter can be bought to enable this. It does retain the USB plug, used to connect your mobile device to the controller, essential for piloting the craft.
  The transmitter has an internal 6000 mAh 2cell LiPo battery. It is charged via a DC power jack under a rubber cover on the right hand side.
Phantom 4 - Full contents
Below is the drone, configured and charged ready for flight with all its accessories removed from the box alongside it. To recap, you are provided the drone & battery, two full sets of props, charger, usb cable and OTG adapter, transmitter and documentation.
Ready to fly
 Now we have finally got 'hands-on' with the drone, we feel the Phantom 4 is a huge step forward in terms of materials and build-quality alone!
  You can watch videos of the craft in action, see further specs or learn about the cost on our product listing page here. If you have any specific questions regarding this Phantom 4 unboxing, especially pertaining to the hardware or setup, leave us a comment below or call us on 01737 457404 and we will endeavor to help!


