With the launch of the Q32 Baja buggy a couple of years ago came the birth of a Q32 upgrades scene. Its easy to see why even the basic micro cars are popular, inexpensive and ideal for indoor use whether at home or in the office. At such a low price point many would even consider them expendable, which has meant many attempting the sort of crazy modifications you wouldn't risk on your Vorza. In this guide we will be showing the flexibility of the HPI Racing Q32 (in this instance the popular new Formula Q32) to accept modification. We will be experimenting with fitting an interchangeable battery system and also an FPV camera and transmitter. Read on to find out how we fared. 

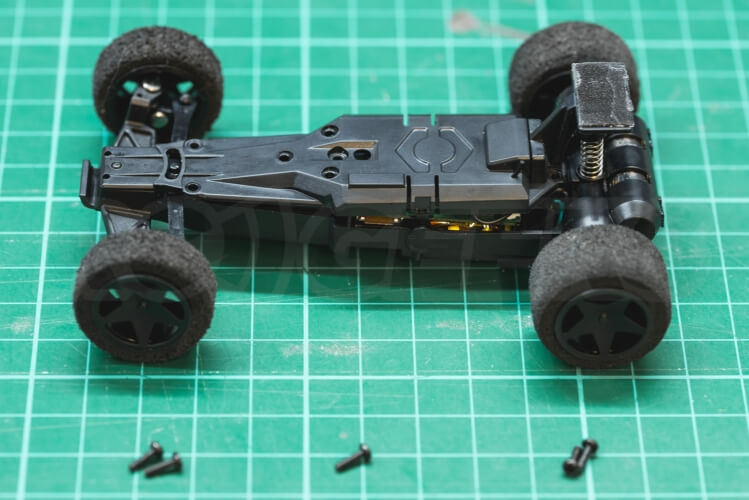 Next we flipped the chassis over and unscrewed the final two screws under the steering system to free the upper chassis plate
  With it open and the steering system removed it looks a little like this. Here you can see the steering motor and motherboard of the model.
  With the top removed you are faced with circuit board (shown above) which you can flip over. On the reverse side is the small standard battery, a 75mAh cell stuck to the board with some foam tape. Note (as pointed out by Phil Stace in the comments section) that the standard battery does include a low-voltage cutoff circuit on its side. Following our guide will remove this, thus you must be careful not to run your replacement battery too low or you will ruin it. We levered this off, de-soldered it from the main-board and disposed of it. The cell we will be using is the 220mAh 1S 3.7v 50c LiPo that we use in our Tiny Whoop drones. We have loads of these in the office which makes them ideal for the swap.
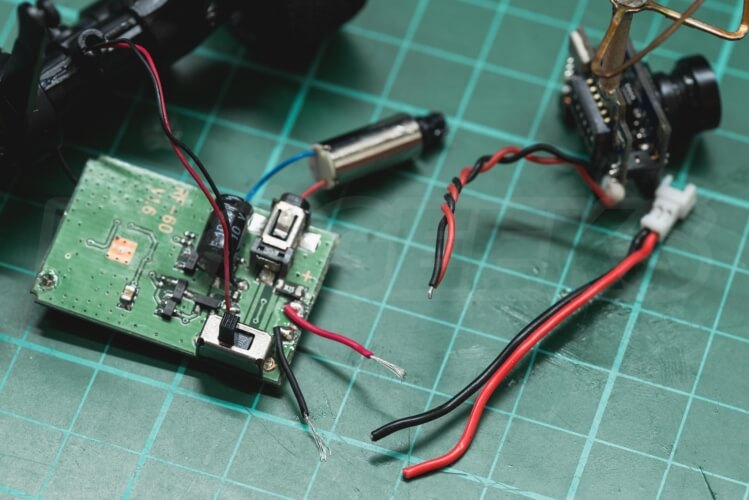 Since we were going to be powering the FPV system from the same battery we split the lead off with a connector for the camera, adding a pair of Pico Molex connectors to the bare ends of the FPV transmitter board wires.
 For testing purposes an elastic band will hold the battery and wiring harness in place. We will most likely move to velcro to secure the cell in actual use.
 The camera/receiver unit is held in place with 3M foam tape. A small hole was cut in the body to allow the FPV power cable to be routed through.
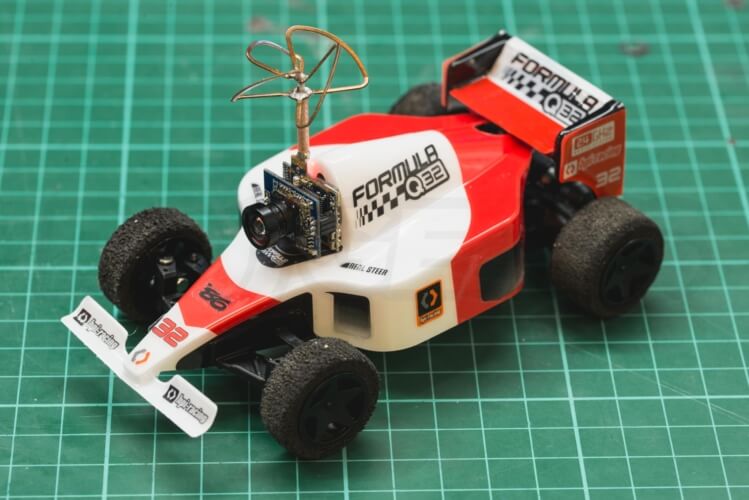
  The body is then re-affixed to the shell using the original factory velcro mount under the nose. Note that with this installation, the rear of the body is raised by the presence of the battery. We actually like this heavily raked look which adds to the caricature style of the model. The finished setup looks like this.
 Whilst we intend to use our Fatshark Dominator V3's for racing, it also gave us a chance to show you the view you can expect with a setup like this. We love how you can see the nose of the car, front wing and the inner edges of the tyres. It really is a drivers eye view! We got distracted and spend the next 10 minutes just tearing around the dispatch area.
  With the modifications complete extensive testing was required. Something I selflessly volunteered myself for over an extended lunch break. Below are my findings after comparing the standard car to our newly upgraded one.
 Not only that but downtime is now a thing of the past. Before we could only get a couple of 'goes' into a lunch break, but thanks to our arsenal of charged 220Mah 1S LiPo's we get a solid hour of relentless racing. The pit-stop to change the cell takes only a moment and you can be back on the carpet in seconds. As such this mod gets two thumbs up from everyone in the office.
 We appreciate that it is a comparatively expensive upgrade on a budget model, but for many of our customers whom already have receivers, goggles and/or screens it is a must-have mod! We shall return next week with some on-board clips of the racers in action to back up our claims.


Q32 Upgrades : What are the advantages?
For relatively little money (in the case of recycling some old gear) you can really expand on your models capabilities: LiPo Conversion : Batteries can be swapped out maximising drive time, no more waiting ages for it to charge. With the right cell it provides longer running times. Gives the ability to power accessories. FPV Modification : On-board camera gives 'drivers eye view' providing an unrivaled immersive experience. Great sense of speed. Can be remotely recorded or just used to continue to drive the vehicle when it is beyond line-of-sight. The video below demonstrates this perfectly. https://www.youtube.com/watch?v=plZsjnqW7XEThe disadvantages (and a Disclaimer!)
Needless to say this will void the warranty on your Q32! Please note that whilst this blog documents our experiments with our Formula Q32, this should be in no way considered a guide. As such RC Geeks are not responsible for any damage to your equipment or self trying to emulate it.What do I need?
You will need the following to complete our Q32 upgrades:- A HPI Q32 (Formula or other variety)
- An FPV Camera with inbuilt transmitter (ours borrowed from a crashed Tiny Whoop)
- Video receiver and display (Screen or goggles)
- 1S LiPo cell and appropriate charger (both of these Tiny Whoop accessories)
- Spare wiring, electrical tape, soldering iron, heat shrink and an elastic band

Dismantling the Formula Q32
We started by removing the shell of the car and the velcro that holds that body to the nose. Then we unscrewed the two rear, two front and one central screw from the top of the chassis. These all appear to be the same size which made re-installation a breeze. Next we flipped the chassis over and unscrewed the final two screws under the steering system to free the upper chassis plate
  With it open and the steering system removed it looks a little like this. Here you can see the steering motor and motherboard of the model.
  With the top removed you are faced with circuit board (shown above) which you can flip over. On the reverse side is the small standard battery, a 75mAh cell stuck to the board with some foam tape. Note (as pointed out by Phil Stace in the comments section) that the standard battery does include a low-voltage cutoff circuit on its side. Following our guide will remove this, thus you must be careful not to run your replacement battery too low or you will ruin it. We levered this off, de-soldered it from the main-board and disposed of it. The cell we will be using is the 220mAh 1S 3.7v 50c LiPo that we use in our Tiny Whoop drones. We have loads of these in the office which makes them ideal for the swap.
Rewiring the Q32
A battery lead can then be added to the board with the appropriate (in our case Pico Molex) connector. Since we were going to be powering the FPV system from the same battery we split the lead off with a connector for the camera, adding a pair of Pico Molex connectors to the bare ends of the FPV transmitter board wires.
Re-Assembly
With all the wiring complete it was time to rebuild the model. Using a knife we cut a small notch out of the side of the lower chassis tub to allow the new wiring to escape. For testing purposes an elastic band will hold the battery and wiring harness in place. We will most likely move to velcro to secure the cell in actual use.
Adding the FPV system
We test the position of the FPV camera system on the shell. In our opinion the best view is gained from fixing it where the drivers helmet would be. The camera/receiver unit is held in place with 3M foam tape. A small hole was cut in the body to allow the FPV power cable to be routed through.
  The body is then re-affixed to the shell using the original factory velcro mount under the nose. Note that with this installation, the rear of the body is raised by the presence of the battery. We actually like this heavily raked look which adds to the caricature style of the model. The finished setup looks like this.
Setting up the FPV system
Our integrated FPV camera and transmitter had dip-switches on the back to set which band and channel it uses. We then used our trusty black pearl monitor/receiver to check the transmission was active. Whilst we intend to use our Fatshark Dominator V3's for racing, it also gave us a chance to show you the view you can expect with a setup like this. We love how you can see the nose of the car, front wing and the inner edges of the tyres. It really is a drivers eye view! We got distracted and spend the next 10 minutes just tearing around the dispatch area.
  With the modifications complete extensive testing was required. Something I selflessly volunteered myself for over an extended lunch break. Below are my findings after comparing the standard car to our newly upgraded one.
Q32 upgrades Review : Battery
The battery mod has brought a new lease of life to the Q32. Whilst you are unlikely to get a performance increase with a similarly spec'd (voltage) battery, you will get a lot more run-time out of your model with the increased mAh capacity. Even with the added weight and power drain of our onboard FPV camera, we get nearly double the run time of the standard car! Not only that but downtime is now a thing of the past. Before we could only get a couple of 'goes' into a lunch break, but thanks to our arsenal of charged 220Mah 1S LiPo's we get a solid hour of relentless racing. The pit-stop to change the cell takes only a moment and you can be back on the carpet in seconds. As such this mod gets two thumbs up from everyone in the office.
Q32 Upgrades Review : FPV Camera Setup
The FPV mod takes the Q32 experience to the next level. We've noticed a lot of comments along the lines of 'FPV all the things' across our various social media accounts, so this particular mod was something we had been itching to do. With the camera mounted barely an inch from the floor the sense of speed you get from your video downlink is really impressive. Whilst driving line-of-sight it might not look quick, on-board with the carpet texture rushing past the front wing it feels incredibly quick! We appreciate that it is a comparatively expensive upgrade on a budget model, but for many of our customers whom already have receivers, goggles and/or screens it is a must-have mod! We shall return next week with some on-board clips of the racers in action to back up our claims.
Q32 Upgrades: More to come
This is just the tip of the iceberg when it comes to Q32 upgrades. When it comes to performance, different wheels, tyres, compounds and upgraded gear-sets mean that there are plenty of HPI supported upgrades we are yet to attempt. Browsing the forums there are also lots of other ideas, such as re-shelling the model with Tamiya plastic kits! As such HPI's Q32 continues to be one of our recommended models for enthusiasts looking for some small-scale fun or for just about anyone as a gift.


