A few years ago, high-end active stabilisation was only available to those with hollywood-sized budgets. Recent innovations with brushless motors have meant the technology is now available at a much more accessible price point, albeit one that often requires plenty of tinkering.
The original Ronin took this a step further in 2014; DJI's using their wealth of experience to bring an active hand-held camera stabiliser that was flexible and simple to use. It was designed to take cameras and equipment up to a 7.25kg payload. It could be hand-held or attached to cranes/jibs etc, and could be utilised by just one operator or a two person team. However for smaller cameras or tight spaces, the Ronin may have been overkill.
Recognising this, DJI have now released the Ronin-M. Designed for smaller popular cameras such as the Canon 5D mk3, Canon C100, Black Magic Cinema Camera, Sony Alpha 7, Panasonic GH4 and more.
 First up the box, in the black and red colour scheme reserved for their 'professional' range of products.
 It measures 480 x 320 x 300mm and has an integrated plastic strap handle.
 Box specifications promote its flexibility. The maximum payload is 8lb or 3.6kg.
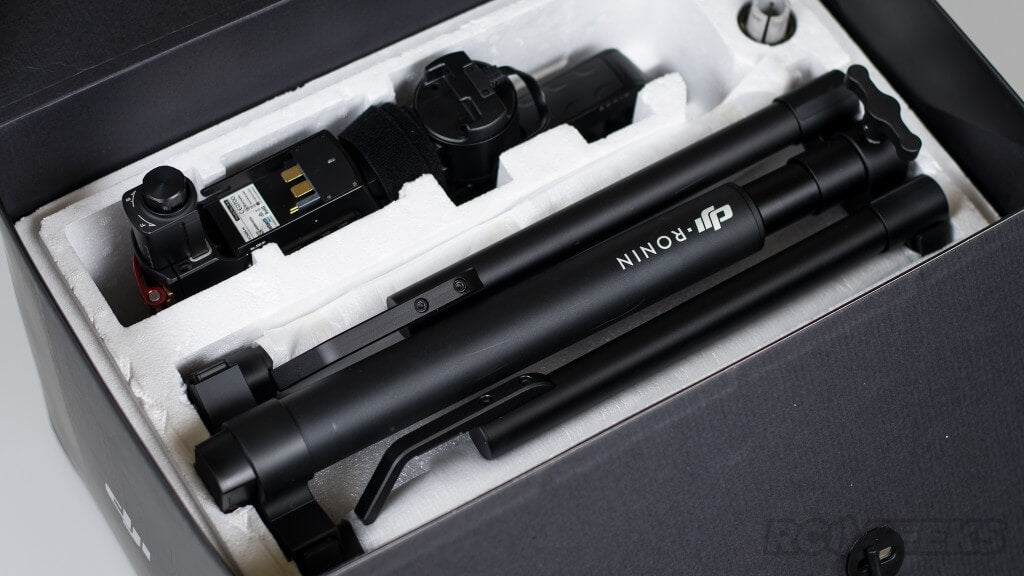 With the box opened and the top polystyrene lid removed, you are presented with the Ronin-M kit.
 The original Ronin came in its own (huge) flight case with custom-cut foam inserts. Our Ronin-M came packaged in cut polystyrene.
 The magnesium stand sits collapsed, at the top of the box.

 The battery, charger, handles and other components all have their own cut-outs. The tight arrangement makes for a portable package, but we doubt the inserts would put up with sustained usage.
 Here is the stand, removed from the box and stripped of packaging.
 Pressing the DJI branded square buttons on the arms will allow you to rotate them out and lock them into place.
 The stand can be extended to full height via the sprung adjuster on the main tube.
 Unfolded the stand looks something like this. Its a sturdy V-stand that allows you to construct, load and configure the Ronin without having to hold it.
The gimbal section of the Ronin-M comes in the box in one piece. It is restrained by two long velcro straps to hold it inline.
 Flipped over, the reverse side of the gimbal, showing the rear of the camera mounting plate.
The Ronin has ports for D.BUS/PPM, USB and CAN connections for controlling or configuring the device.
The receiver for the camera complete with quick release lever on the side and catch, shown on the left.
 Cameras are mounted to the top of this plate. Measurement markings enable you to note where your camera is mounted, especially useful when replacing your camera and quickly regaining the balance.
 The underside of the same plate. Several positions are available. Also note the front screws to fit the lens support brackets.
 DJI supply two different tripod screw thread sizes with flat and cone shaped heads, that should cover most applications.
 The kit also includes the previously mentioned lens support mount, seen in the above photo, the black Y-shaped piece of metal.
 Two allen wrenches are included to assist in tightening the camera down to the plate.
 In everyday use you are likely to hand-hold the outfit with the three rubber-gripped handles.
 But the gimbal can be mounted to a crane or jib, attaching with a large cylindrical connector on-top of the gimbal. This is the same mount that the top handle attaches to.
 The outer arms mate to the top handle via these two carbon fibre pole horizontal poles.
 The Ronin-M is powered by a 3400 mAh 14.8v 4S LiPo intelligent battery.
 It appears quite similar in construction to the original Ronin battery. You cannot use this battery in the normal Ronin but you can use the Ronin battery in the Ronin-M.
A short press of the button (when the battery is fitted or otherwise) will light up the level indicator LED's, displaying the current charge level. The battery will come with some charge in it but it is always advisable to fully charge it before starting your initial calibration.
 The Ronin comes with its own battery charger, power cable and USB cables. The latter is use for PC configuration of the gimbal.
 Levering the flap on the charge plug, it attaches to the lip on the bottom of the battery. When drained the battery takes approximately an hour to charge.
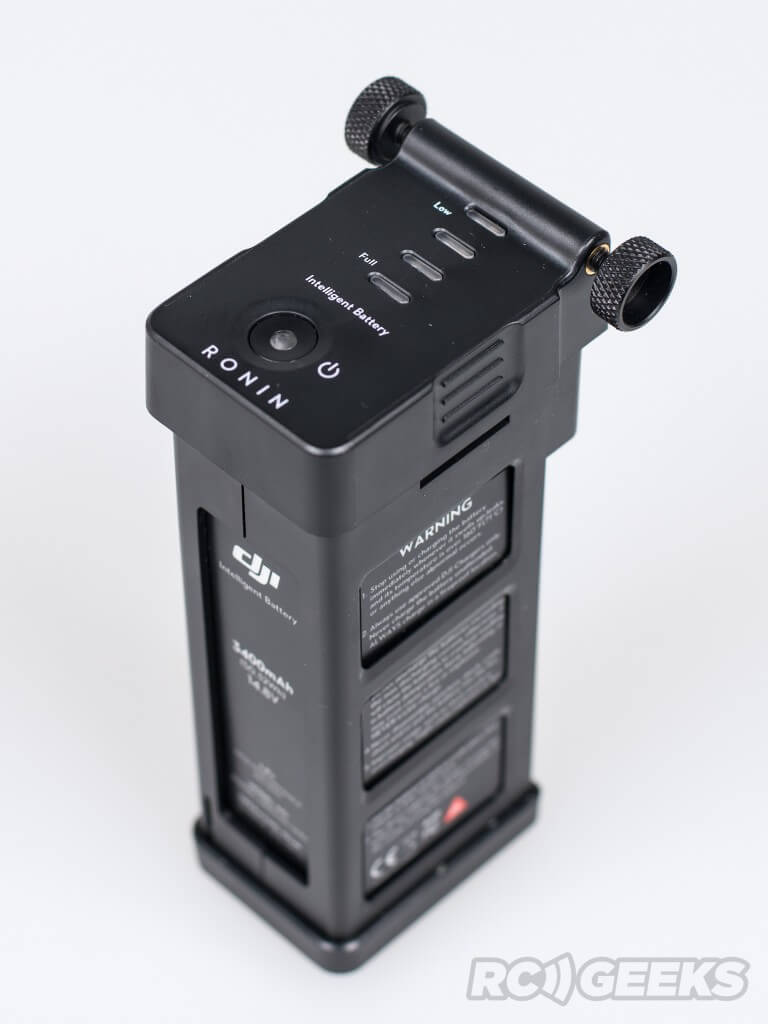 We would recommend charging the battery stood up, enabling monitoring of the charge status lights on top. DJI state that the Ronin-M can run for over 6 hours on a full charge (payload and usage dependant).
 The controller is powered up by the slider switch on the front with the power indicator lighting a solid green when functioning normally. The four LED to the right of the switch are battery level indicators.
 In the default setup, moving the left stick horizontally controls the roll axis of the gimbal. Horizontal movements of the right stick pan the gimbal and vertical movements of the same stick control the tilt axis.
 The transmitter has a carry handle and a jog dial at the top, the later is currently unused.

 With the stand unfolded and all of the components removed the box, we can start constructing the Ronin-M. For simplicity we will just be building up the Ronin-M and mounting a light Panasonic GH4 camera with prime lens.
 We start with the top handle, pictured above.
 The horizontal arms have an aluminium guide section on one end, line each of these up and slide them into the top handle, before screwing the collar over them to tighten them.
 You should be left with something looking like this.
 Next take the two vertical grips. Rotate the red tabs anti-clockwise to slacken them off.
 Laying the top handle back, slide these over the ends of the horizontal carbon bars and tighten them down by rotating the red tabs. This will contract the top section, gripping the horizontal tube. Be careful not to overtighten these.
 You should be left with something similar to the above. The beauty of the clamp attachments for the grip handles is that they can be positioned at any point along the bar or at a different angle, at the operator's requirement. Its worth noting that they cannot be positioned too far inward or they will block the rotation of the gimbal section below. The can even both be removed to minimise the width of the setup.
 Rotating the completed handle over, you should see the gimbal mount plate. Release the catch by unscrewed the red tab on the front.
 The top of the gimbal section looks like this and is designed to receive the top handle or other future mounts. Slide the handle horizontally over the top of the gimbal and lock it into place by rotating the red tab.
 It should look as above. From now on it is easier to work on the Ronin-M with it placed in its stand, the horizontal bar resting in the pickups. Its worth checking at this stage that the gimbal can rotate 360 degrees below the handle without hitting anything.
 Now it is time to install the battery. Check it is charged by pressing and releasing the power button. Slacken the thumbscrews at the top and then slide the battery into its receiver on the back of the gimbal.
 Ensure it is pushed all the way down in its slot before hand tightening the thumbscrews to keep it in place.
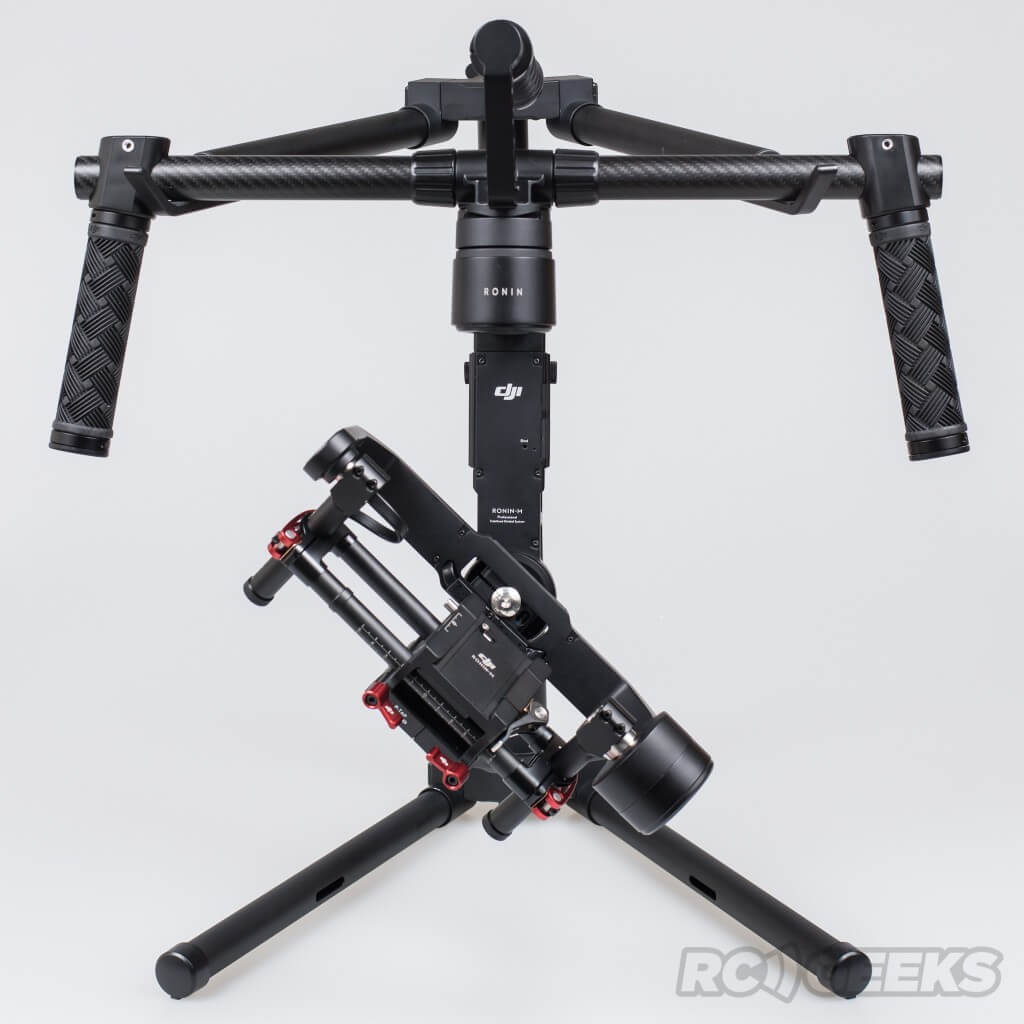 The Ronin-M, ready to receive a camera.
 We shall be installing and balancing our Panasonic GH4 with a Olympus 12mm f/2.0 lens. Placing the mounting plate on the upturned camera, we attached it using the the tripod mounting screws and the allen key from the mounting parts bag. An educated guess was made regarding the camera's centre-of-gravity.
The Ronin-M needs to balance the camera as a 'solid' unit. Thus on cameras with 'soft' lens mountings (such as Canon 5D's) the lens support system needs to be placed. This screws into the leading edge of the camera mount plate and supports larger lens.
 Flip the quick release latch open (above pictured closed) and slide the mounted camera in from the front. The metal retaining bolt at the back will slide over and catch, stopping the plate from sliding back out.
 Before turning on the Ronin-M it's important to achieve a reasonable balance to the gimbal. Having the gimbal setup to achieve a fairly natural balance will mean less work for the motors and will ensure the best performance. This is done by adjusting the four axis, releasing the camera and noting if it 'holds' its position at rest when released. The Ronin-M requires no tools for this adjustment.
 Following the manual, we started by adjusting the vertical tilt. Rotating the gimbal so the lens was facing up (ignore the photo, this is used to depict which adjusters we were moving) we released the two vertical adjuster tabs and slid the crossbar around until the camera pointed upward when released. We then closed the adjuster tabs.
 Next up was the roll axis, this enables the camera to stay level. The two lock tabs under the camera release the plate and allow it to slide left and right until a balance is achieved.
 The tilt axis is adjusted by releasing the camera clamp and sliding the entire camera and plate forward and backwards. Only slight adjustments are usually required assuming the plate was attached to the camera correctly. When re-tightened the camera should remain steady at any angle.
 The final main adjustment is found at the back of the gimbal and is for the pan axis. Releasing the large red clamp and rotating the dial at the end of the arm will slide the entire gimbal forward or back to balance its weight. To check if the pan axis is balanced, lift one of the handle-bars slightly out of the stand and watch to see if the camera stays still or swings.
 If the camera is very light an advanced roll adjustment may be required to adjust the tilt motor assembly. Please see the manual for more details on this.
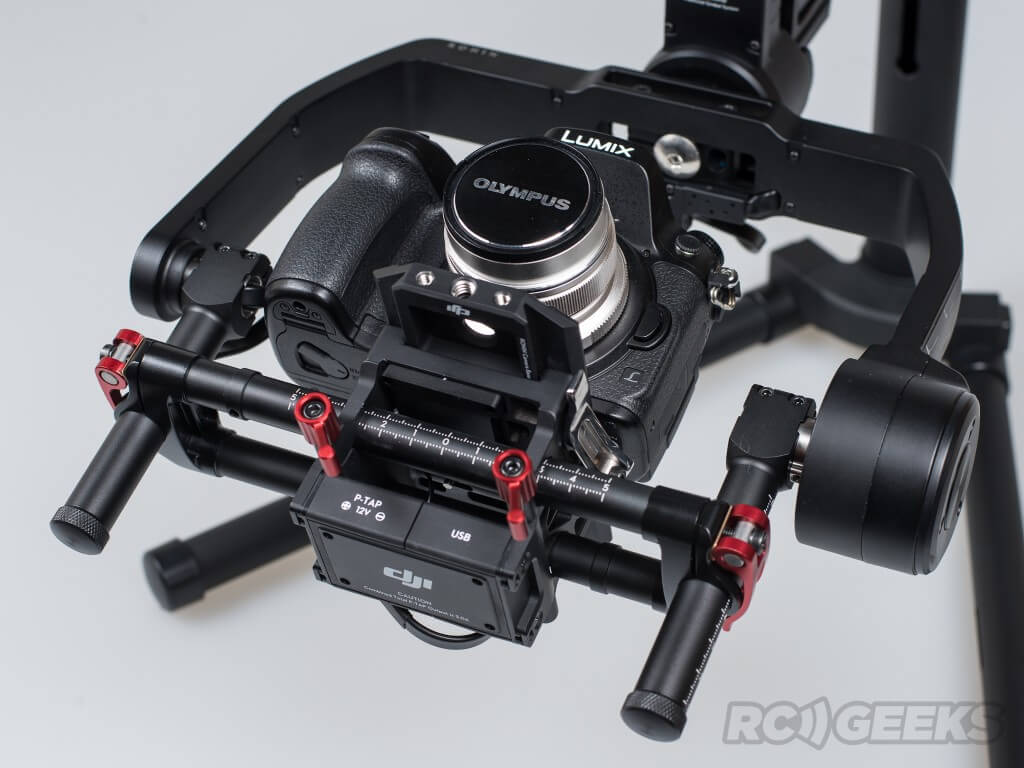 To confirm the basic balance is achieved, move the camera into the above position and release it. It should stay in that position without drifting.
 Here is our Ronin-M, balanced up for our Panasonic GH4. It is now safe to power up the Ronin-M via the button on the battery. Press and hold the button for 1-2 seconds, the battery indicator lights will light in sequence, the Ronin-M will fire up and centre itself.
 You can then turn on the transmitter to test the remote operation, the power light should stay solid green once powered up. The transmitter should come bound to the Ronin-M, see the manual for more information on pairing a new controller.
 Move the sticks around to confirm they move the gimbal. The top-right mode switch can be used to reset the gimbal to its centre position and re-enable smooth track.
 A quick photo from the rear of the Ronin-M with the GH4 powered up.
 A wide shot of the Ronin-M, powered up and ready for calibration.
The quickest way to calibrate a Ronin-M is via the DJI Assistant iOS application. This can be downloaded from iTunes
 Note: Although an Android application is available, we had some trouble connecting our test Ronin-M to it. This has since been rectified.
 Fire up the app and select the Ronin once the bluetooth has picked it up. Switch to the 'more' menu at the bottom and restore the system defaults. Reboot the system once this has finished by turning it on and off.
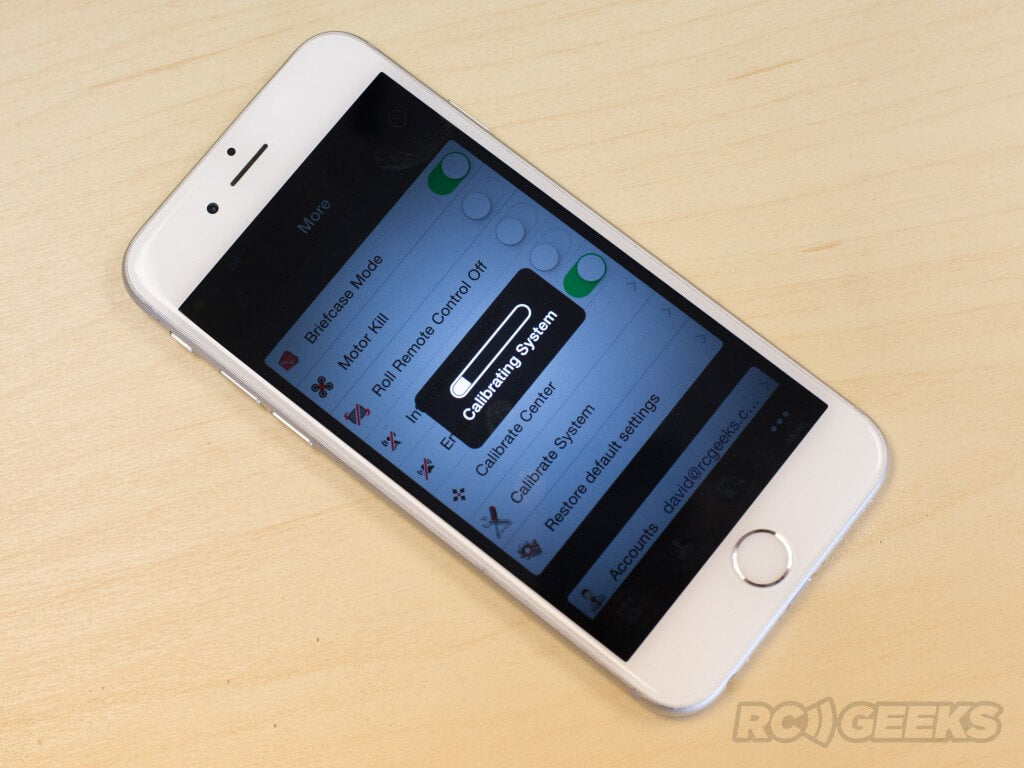 Once that is complete, press calibrate system and wait for the process bar to complete. At this point the Ronin-M will move around a little and swing the camera down.
 To fine tune the central position of the Ronin-M, press 'calibrate center' under the more menu. Use the transmitter to centralise the camera in all directions.
 Finally, switch to the gimbal screen and begin the 'Auto Tune Stability' process. Whilst running the gimbal will shake and vibrate as it fine-tunes its balance.
 Standard 'underslung' two-handed operation
 One-hand 'underslung' operation from above
 'Briefcase' mode, allowing a slim profile in tight spaces without removing the handles. Simply rotate the gimbal 90 degrees on its roll-axis to enter this mode. This mode can be disabled in the app.
 'Upright' mode, useful for shooting at eye level or mounting to cars. Flipping the gimbal 180 degrees forward will switch into this mode.
 With our build complete, we headed out to demonstrate how well the Ronin-M can work as a steadicam. We eventually intend to add a video to this blog comparing stabilised and un-stabilised footage.
For more information on the Ronin-M or to buy a unit, please see our product listing page.
What is in the box?
We recently received a unit here at RC Geeks so we decided to put it together First up the box, in the black and red colour scheme reserved for their 'professional' range of products.
 It measures 480 x 320 x 300mm and has an integrated plastic strap handle.
 Box specifications promote its flexibility. The maximum payload is 8lb or 3.6kg.
 With the box opened and the top polystyrene lid removed, you are presented with the Ronin-M kit.
 The original Ronin came in its own (huge) flight case with custom-cut foam inserts. Our Ronin-M came packaged in cut polystyrene.
 The magnesium stand sits collapsed, at the top of the box.

 The battery, charger, handles and other components all have their own cut-outs. The tight arrangement makes for a portable package, but we doubt the inserts would put up with sustained usage.
Constructing the stand
 Here is the stand, removed from the box and stripped of packaging.
 Pressing the DJI branded square buttons on the arms will allow you to rotate them out and lock them into place.
 The stand can be extended to full height via the sprung adjuster on the main tube.
 Unfolded the stand looks something like this. Its a sturdy V-stand that allows you to construct, load and configure the Ronin without having to hold it.
Up close with the Gimbal
 Flipped over, the reverse side of the gimbal, showing the rear of the camera mounting plate.
It also has two power taps (total max draw 3.0amps) a usb plug and connections for light bridge and the Ronin-M's GCU. These are stationed conveniently under the camera mounting plate to ensure short runs to any powered gear.
 Cameras are mounted to the top of this plate. Measurement markings enable you to note where your camera is mounted, especially useful when replacing your camera and quickly regaining the balance.
 The underside of the same plate. Several positions are available. Also note the front screws to fit the lens support brackets.
 DJI supply two different tripod screw thread sizes with flat and cone shaped heads, that should cover most applications.
 The kit also includes the previously mentioned lens support mount, seen in the above photo, the black Y-shaped piece of metal.
 Two allen wrenches are included to assist in tightening the camera down to the plate.
Hands on
 In everyday use you are likely to hand-hold the outfit with the three rubber-gripped handles.
 But the gimbal can be mounted to a crane or jib, attaching with a large cylindrical connector on-top of the gimbal. This is the same mount that the top handle attaches to.
 The outer arms mate to the top handle via these two carbon fibre pole horizontal poles.
Battery and Charger
 The Ronin-M is powered by a 3400 mAh 14.8v 4S LiPo intelligent battery.
 It appears quite similar in construction to the original Ronin battery. You cannot use this battery in the normal Ronin but you can use the Ronin battery in the Ronin-M.
A short press of the button (when the battery is fitted or otherwise) will light up the level indicator LED's, displaying the current charge level. The battery will come with some charge in it but it is always advisable to fully charge it before starting your initial calibration.
 The Ronin comes with its own battery charger, power cable and USB cables. The latter is use for PC configuration of the gimbal.
 Levering the flap on the charge plug, it attaches to the lip on the bottom of the battery. When drained the battery takes approximately an hour to charge.
 We would recommend charging the battery stood up, enabling monitoring of the charge status lights on top. DJI state that the Ronin-M can run for over 6 hours on a full charge (payload and usage dependant).
Transmitter : Remote control Second Operator
The Ronin-M comes with a transmitter, allowing a second operator to pan, tilt and roll the camera independant of the Ronin-M's movement at a range of up to 200m. The top right switch enable/disable/reset the Smooth Track mode and the top right switch adjust speed settings. The controller is powered up by the slider switch on the front with the power indicator lighting a solid green when functioning normally. The four LED to the right of the switch are battery level indicators.
 In the default setup, moving the left stick horizontally controls the roll axis of the gimbal. Horizontal movements of the right stick pan the gimbal and vertical movements of the same stick control the tilt axis.
 The transmitter has a carry handle and a jog dial at the top, the later is currently unused.

Putting It Together
 With the stand unfolded and all of the components removed the box, we can start constructing the Ronin-M. For simplicity we will just be building up the Ronin-M and mounting a light Panasonic GH4 camera with prime lens.
 We start with the top handle, pictured above.
 The horizontal arms have an aluminium guide section on one end, line each of these up and slide them into the top handle, before screwing the collar over them to tighten them.
 You should be left with something looking like this.
 Next take the two vertical grips. Rotate the red tabs anti-clockwise to slacken them off.
 Laying the top handle back, slide these over the ends of the horizontal carbon bars and tighten them down by rotating the red tabs. This will contract the top section, gripping the horizontal tube. Be careful not to overtighten these.
 You should be left with something similar to the above. The beauty of the clamp attachments for the grip handles is that they can be positioned at any point along the bar or at a different angle, at the operator's requirement. Its worth noting that they cannot be positioned too far inward or they will block the rotation of the gimbal section below. The can even both be removed to minimise the width of the setup.
 Rotating the completed handle over, you should see the gimbal mount plate. Release the catch by unscrewed the red tab on the front.
 The top of the gimbal section looks like this and is designed to receive the top handle or other future mounts. Slide the handle horizontally over the top of the gimbal and lock it into place by rotating the red tab.
 It should look as above. From now on it is easier to work on the Ronin-M with it placed in its stand, the horizontal bar resting in the pickups. Its worth checking at this stage that the gimbal can rotate 360 degrees below the handle without hitting anything.
 Now it is time to install the battery. Check it is charged by pressing and releasing the power button. Slacken the thumbscrews at the top and then slide the battery into its receiver on the back of the gimbal.
 Ensure it is pushed all the way down in its slot before hand tightening the thumbscrews to keep it in place.
 The Ronin-M, ready to receive a camera.
Installing a Camera
 We shall be installing and balancing our Panasonic GH4 with a Olympus 12mm f/2.0 lens. Placing the mounting plate on the upturned camera, we attached it using the the tripod mounting screws and the allen key from the mounting parts bag. An educated guess was made regarding the camera's centre-of-gravity.
The Ronin-M needs to balance the camera as a 'solid' unit. Thus on cameras with 'soft' lens mountings (such as Canon 5D's) the lens support system needs to be placed. This screws into the leading edge of the camera mount plate and supports larger lens.
 Flip the quick release latch open (above pictured closed) and slide the mounted camera in from the front. The metal retaining bolt at the back will slide over and catch, stopping the plate from sliding back out.
Ronin-M : Basic Balancing
 Before turning on the Ronin-M it's important to achieve a reasonable balance to the gimbal. Having the gimbal setup to achieve a fairly natural balance will mean less work for the motors and will ensure the best performance. This is done by adjusting the four axis, releasing the camera and noting if it 'holds' its position at rest when released. The Ronin-M requires no tools for this adjustment.
 Following the manual, we started by adjusting the vertical tilt. Rotating the gimbal so the lens was facing up (ignore the photo, this is used to depict which adjusters we were moving) we released the two vertical adjuster tabs and slid the crossbar around until the camera pointed upward when released. We then closed the adjuster tabs.
 Next up was the roll axis, this enables the camera to stay level. The two lock tabs under the camera release the plate and allow it to slide left and right until a balance is achieved.
 The tilt axis is adjusted by releasing the camera clamp and sliding the entire camera and plate forward and backwards. Only slight adjustments are usually required assuming the plate was attached to the camera correctly. When re-tightened the camera should remain steady at any angle.
 The final main adjustment is found at the back of the gimbal and is for the pan axis. Releasing the large red clamp and rotating the dial at the end of the arm will slide the entire gimbal forward or back to balance its weight. To check if the pan axis is balanced, lift one of the handle-bars slightly out of the stand and watch to see if the camera stays still or swings.
 If the camera is very light an advanced roll adjustment may be required to adjust the tilt motor assembly. Please see the manual for more details on this.
 To confirm the basic balance is achieved, move the camera into the above position and release it. It should stay in that position without drifting.
 Here is our Ronin-M, balanced up for our Panasonic GH4. It is now safe to power up the Ronin-M via the button on the battery. Press and hold the button for 1-2 seconds, the battery indicator lights will light in sequence, the Ronin-M will fire up and centre itself.
 You can then turn on the transmitter to test the remote operation, the power light should stay solid green once powered up. The transmitter should come bound to the Ronin-M, see the manual for more information on pairing a new controller.
 Move the sticks around to confirm they move the gimbal. The top-right mode switch can be used to reset the gimbal to its centre position and re-enable smooth track.
 A quick photo from the rear of the Ronin-M with the GH4 powered up.
 A wide shot of the Ronin-M, powered up and ready for calibration.
The quickest way to calibrate a Ronin-M is via the DJI Assistant iOS application. This can be downloaded from iTunes
Configuration via Smartphone
 Note: Although an Android application is available, we had some trouble connecting our test Ronin-M to it. This has since been rectified.
 Fire up the app and select the Ronin once the bluetooth has picked it up. Switch to the 'more' menu at the bottom and restore the system defaults. Reboot the system once this has finished by turning it on and off.
 Once that is complete, press calibrate system and wait for the process bar to complete. At this point the Ronin-M will move around a little and swing the camera down.
 To fine tune the central position of the Ronin-M, press 'calibrate center' under the more menu. Use the transmitter to centralise the camera in all directions.
 Finally, switch to the gimbal screen and begin the 'Auto Tune Stability' process. Whilst running the gimbal will shake and vibrate as it fine-tunes its balance.
Ronin-M : Usage Configurations
The app is fully featured and allows all sorts of adjustments and customisations. For now the Ronin-M is configured for basic use. Below are a few modes the Ronin-M can be used in: Standard 'underslung' two-handed operation
 One-hand 'underslung' operation from above
 'Briefcase' mode, allowing a slim profile in tight spaces without removing the handles. Simply rotate the gimbal 90 degrees on its roll-axis to enter this mode. This mode can be disabled in the app.
 'Upright' mode, useful for shooting at eye level or mounting to cars. Flipping the gimbal 180 degrees forward will switch into this mode.
 With our build complete, we headed out to demonstrate how well the Ronin-M can work as a steadicam. We eventually intend to add a video to this blog comparing stabilised and un-stabilised footage.
For more information on the Ronin-M or to buy a unit, please see our product listing page.


