Have you ever wondered what makes the new DJI Spark go, but never fancied invalidating your warranty? In the latest in our series of teardowns, we handed our technicians a brand new Alpine White DJI Spark and asked them to find out what was inside.

 Next flip the drone over and remove the battery.
  With the battery removed you will see four 1.5mm hex screws (two at the back by the memory card flap and two either side of the label) which need to be removed.
  Then there are two further hex screws either-side of the camera unit at the front of the drone. Carefully rotate the gimbal over to gain access.
  Finally use a plastic opening tool and slide it in between the coloured plastic lid and the grey plastic base. Carefully run it around the craft releasing all the plastic clips. We found starting at the end closest to the memory card flap the easiest way in.
  With the plastic clips released you can remove the lid revealing the internals.
  Removing the lid is pretty straight forward and whilst it will undoubtably void your warranty, we can see users doing this themselves in the future. For those looking to modify their craft now we would suggest going for something like the dbrand skins instead.
 the board can be seen sat ontop of the at the rear of the craft with the DJI stickers
 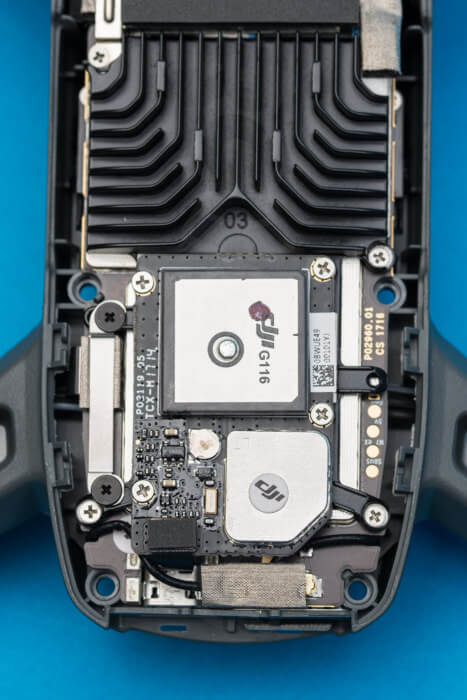 Whilst they are not directly connected to the receiver board, we found this was a good time to disconnect the two antennas indicated below. To get to the connectors you need to remove the sticky back foam padding. We advise using a plastic spudger to release these. Once released you should use the tool to release the ribbon connector cable on the rear edge of the receiver board.
  Once this is out you can remove the four cross-head screws that hold it down.
  Before carefully lifting it off of the mainboard.
  This compact board is keyed so it can only be re-installed one way, important as it likely contains the compass and other directional dependant sensors.
 Some people recommend removing the fan and heatsink but we left ours in place.
  You will need to remove the metal right angle piece (shown below to the left of the fan) to expose the connectors that connect the camera to the mainboard. These are hidden under foil foam tape under this L-shaped piece. Take your time releasing the plugs as they are fragile.
  There is another metal locking strip holding down the connectors to the battery and more, at the rear of the craft (also on the left side) that can be identified by the black screws. With all the outer edge screws and communication flex cables removed you can carefully lift the board and move it backwards away from the front sensor array and out of the chassis. We recommend taking your time with this as it is easy to miss a cable.
  Lets have a closer look at that motherboard. You can see the fan and heat sink setup that directs air across the processors and out of the vented sides of the drone. You can also see the nine connection points to the rest of the craft that you will need to check are clear before lifting it out.
  It still fascinates us that a drone with such processing capabilities can be controlled by a board so small. The lower part of the board is covered with a metal shield that doubtless also acts as a heat sink. With the motherboard removed you can gain access to the gimbal and front facing sensors.
 Unscrew the silver cross head fixing.
  It can then be lifted straight up and out. Below we can see the front facing camera and the IR sender/receiver, both used for avoiding objects.
  Note that our grounding mount has been bent up in the above photo but this was not necessary for removal.
 The camera and gimbal then lift out as one. The tiny camera/gimbal unit looks like this when removed.
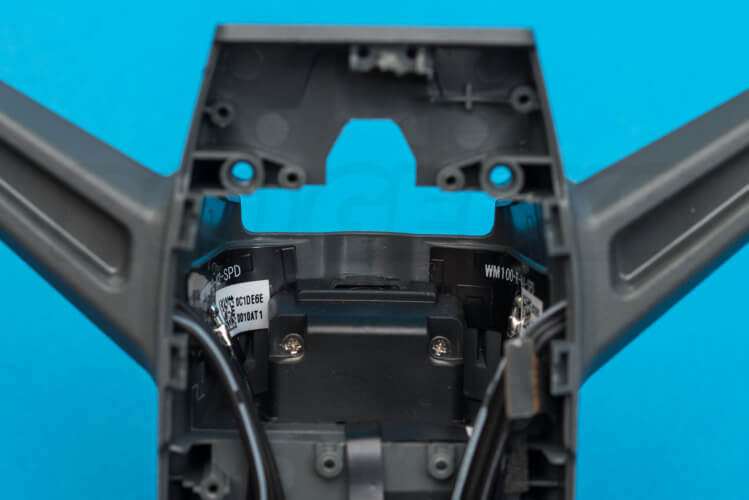 Note the front location of the receiver and wifi antennas.
  And the wiring that heads off down the arms for the speed controllers and motors.
 This is simply two small star-drive screws. The release spring sits over the motor shaft and pokes through the release plate. Next, flip the drone over and use a flat-head screwdriver to remove the led cap cover, you should see a little indent below the translucent LED window underneath the arm.
  With this cap removed, unscrew the retaining ring that holds in place the tiny speed controller.
  Carefully flip the edge of the speed controller up to expose the three star drive motor screws below.
 We were quite impressed at how easily the drone comes apart, but the combination of advanced electronic parts into units suggests that replacement part prices are going to be expensive. That said thanks to the material choices the Spark seems to be quite the robust aircraft, recently shrugging off an impact with a tree and only requiring a new propeller.
Spark Teardown : Dismantling the DJI Spark
Please note : This is not intended to be an instructive guide (such as those found on ifixit) for dismantling your drone, but more a documentation of our investigation into the architecture of the new quadcopter. We take no responsibility for any potentially warranty-invalidating work carried out on your drone by yourself, it is at your own risk. As ever, if you are looking for a closer look or just more detail, click to view the images at a larger size.Tools required
We needed the following tools to dismantle our Alpine White DJI Spark.- 1.5mm hex
- J0 phillips head
- t6 torx
- Plastic levers
- Small flat head (around 1.5mm) for levering plastic shell parts

Removing the DJI Spark lid
The lid isn't complex to remove. Start by removing the propellers. Next flip the drone over and remove the battery.
  With the battery removed you will see four 1.5mm hex screws (two at the back by the memory card flap and two either side of the label) which need to be removed.
  Then there are two further hex screws either-side of the camera unit at the front of the drone. Carefully rotate the gimbal over to gain access.
  Finally use a plastic opening tool and slide it in between the coloured plastic lid and the grey plastic base. Carefully run it around the craft releasing all the plastic clips. We found starting at the end closest to the memory card flap the easiest way in.
  With the plastic clips released you can remove the lid revealing the internals.
  Removing the lid is pretty straight forward and whilst it will undoubtably void your warranty, we can see users doing this themselves in the future. For those looking to modify their craft now we would suggest going for something like the dbrand skins instead.
Removing the Receiver board
Its time to get serious with this Spark teardown. The GPS/Glonass board is the next component we removed. the board can be seen sat ontop of the at the rear of the craft with the DJI stickers
  Whilst they are not directly connected to the receiver board, we found this was a good time to disconnect the two antennas indicated below. To get to the connectors you need to remove the sticky back foam padding. We advise using a plastic spudger to release these. Once released you should use the tool to release the ribbon connector cable on the rear edge of the receiver board.
  Once this is out you can remove the four cross-head screws that hold it down.
  Before carefully lifting it off of the mainboard.
  This compact board is keyed so it can only be re-installed one way, important as it likely contains the compass and other directional dependant sensors.
Spark Teardown : Main board removal
Now to the meat of the teardown, removing the large motherboard. It is held in by several screws around the edges of the craft. Some people recommend removing the fan and heatsink but we left ours in place.
  You will need to remove the metal right angle piece (shown below to the left of the fan) to expose the connectors that connect the camera to the mainboard. These are hidden under foil foam tape under this L-shaped piece. Take your time releasing the plugs as they are fragile.
  There is another metal locking strip holding down the connectors to the battery and more, at the rear of the craft (also on the left side) that can be identified by the black screws. With all the outer edge screws and communication flex cables removed you can carefully lift the board and move it backwards away from the front sensor array and out of the chassis. We recommend taking your time with this as it is easy to miss a cable.
  Lets have a closer look at that motherboard. You can see the fan and heat sink setup that directs air across the processors and out of the vented sides of the drone. You can also see the nine connection points to the rest of the craft that you will need to check are clear before lifting it out.
  It still fascinates us that a drone with such processing capabilities can be controlled by a board so small. The lower part of the board is covered with a metal shield that doubtless also acts as a heat sink. With the motherboard removed you can gain access to the gimbal and front facing sensors.
Spark Front facing sensors
The last board is situated in the front of the chassis behind the glossy rectangular window. Unscrew the silver cross head fixing.
  It can then be lifted straight up and out. Below we can see the front facing camera and the IR sender/receiver, both used for avoiding objects.
  Note that our grounding mount has been bent up in the above photo but this was not necessary for removal.
Replacing the Spark Camera and Gimbal
We removed the camera and gimbal together through the top of the chassis. The screws holding it to the frame are the silver cross head ones shown below. You will need to remove all four of these to free the plastic damping mount from the frame. The camera and gimbal then lift out as one. The tiny camera/gimbal unit looks like this when removed.
The base chassis
With the boards removed we can take a look at the wiring, Note the front location of the receiver and wifi antennas.
  And the wiring that heads off down the arms for the speed controllers and motors.
Removing the Spark motors
The last step of our Spark teardown was to look at the propulsion side. We started by stripping the quick release plate from the top of the motor. This is simply two small star-drive screws. The release spring sits over the motor shaft and pokes through the release plate. Next, flip the drone over and use a flat-head screwdriver to remove the led cap cover, you should see a little indent below the translucent LED window underneath the arm.
  With this cap removed, unscrew the retaining ring that holds in place the tiny speed controller.
  Carefully flip the edge of the speed controller up to expose the three star drive motor screws below.
DJI Spark Teardown complete
The drone and its core components can be seen spread out below, as ever click the photo for a bigger version. We were quite impressed at how easily the drone comes apart, but the combination of advanced electronic parts into units suggests that replacement part prices are going to be expensive. That said thanks to the material choices the Spark seems to be quite the robust aircraft, recently shrugging off an impact with a tree and only requiring a new propeller.


