Order a Ninebot Mini Now! The Ninebot Mini is an electric vehicle proving popular for passengers of all ages. Used around the university campus or in a 'final mile transport' role, the market for personal transport continues to expand. As the falling price of technology makes solutions like the mini accessible to more of us, we decided to get our hands on one and test it in the real world.
 It can cope with a variety of terrain from tarmac to sand and stones including slopes up to 15 degrees. The lightweight magnesium construction and battery distribution allow for a natural balance and its IP54 rating its safe to travel on, even when its raining.

 The contents include:

 included 63 Volt 2 Amp wall charger. To charge the Mini, power it down and lay it on its 'back'. On the front between the headlights you will see a small flap that hinges upwards, behind which lies the keyed four pin charge port, covered by a (retaining) rubber cap. [gallery columns="4" size="medium" link="file" ids="https://cdn.shopify.com/s/files/1/0263/8469/5395/files/Ninebot-Mini-Review-Fast-Charger.jpg|"] The led on the charging brick will switch from green to red when charging and return to green when fully charged. Also note that the display on the front of the Mini animates as the battery 'fills up'. We'd love to see manufacturers fix fast charging circuitry to devices like this but understand that temperature control and battery longevity issues perhaps limit this technology at this budget. Indeed note that the manufacturer states the device should be charged between 0° and 40° Celsius to extend the life of the battery.
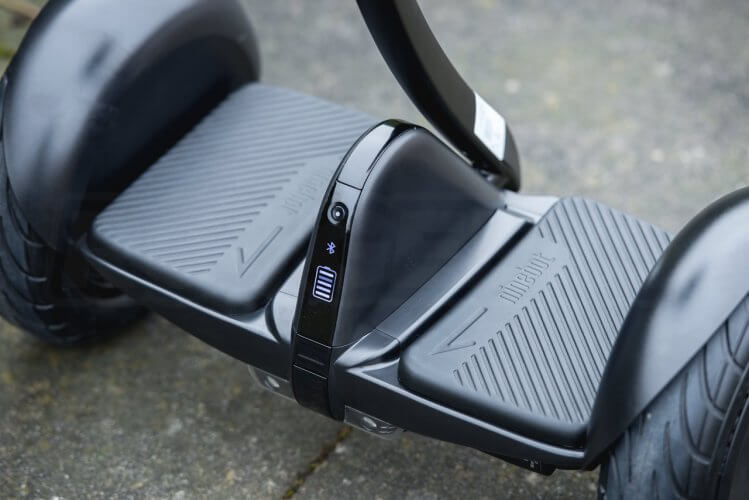 Below this is the speed limiter indicator (depicted by a dial icon) enabled by default when you start using the device it limits the top speed to 7km and must be 'unlocked' through continued use. This can be disabled and adjusted via the smartphone app. Lastly we have the battery indicator as seen above. Each bar of the icon represents 20% of the batteries power level. The Ninebot will reduce its top speed as the battery depletes, beeping when the power level is extremely low. If you leave the device powered on but unused for 10 minutes, or if you knock it over and leave it on the ground for 30 seconds it will power itself down to save its battery.
 The soft rubber pads of the footplate offer good grip to keep you onboard, essential when the Ninebot Mini can 'pull up' in 3.4m on dry surfaces.
  The deck containing the batteries and electronics is impressively slim meaning the Mini has 8cm ground clearance.
  Wheel guards run close to the tyres allowing you to use the Mini on wet surfaces without getting soaked by spray. The big rubber tyres providing a comfortable (if sensitive) ride.
  It has two useful headlights mounted underneath the footplate that light a good few meters ahead. These automatically come on when it gets dark, but can be over-ridden in the app. At the rear the lights can be configured to all sort of patterns including brake and turn signals (red and orange respectively). [gallery columns="2" size="medium" ids="https://cdn.shopify.com/s/files/1/0263/8469/5395/files/Ninebot-Mini-Review-headlights.jpg|"]
 Foot position is important (aim to place your feet centrally on the pads with your arches over the axle) but confidence and commitment are the key. Place your dominant foot on the device, transfer your weight onto it whilst quickly and decisively stepping your other foot onto the platform.
  Unless you are feeling confident, we suggest having someone on hand to help you the first time you try mounting the Ninebot Mini. Have them stand to the side at the front of the device and hold your hands whilst you step on. The most common issue people have is trying to balance against the correction of the device, resulting in it rocking back and forth trying to fight against them! [gallery link="file" columns="2" size="medium" ids="https://cdn.shopify.com/s/files/1/0263/8469/5395/files/Ninebot-Mini-Review-riding-rear.jpg|"] Drive the Ninebot forward or backwards with a gentle leaning motion in that direction. This can be frightening at first, requiring some faith in the device. The further you lean the faster the Mini will travel in that direction. Should you lean too far either forward or backward and reach the maximum attack angle, the device will beep at you to warn you to back off and will actually start to tilt the footplate in the opposite direction to slow itself. [gallery columns="2" size="medium" link="file" ids="https://cdn.shopify.com/s/files/1/0263/8469/5395/files/Ninebot-Mini-Review-riding-rotating-left.jpg|"] Steer the Ninebot by leaning left or right. The perpendicular pressure on the steering tube will instruct the board to turn. The further the steerer is pushed the faster the Mini will turn, allowing tight turns or rotations on the spot. Taller riders may initially find standing with soft (slightly bent) knees can help, but we recommend relaxing and standing upright, interacting with the pads with their inner leg.
 When connected, the dashboard has the direction, battery level, current speed, limit speed, remaining mileage and more are displayed. Sat as standard on a white background, there is a 'dark' skin for battery saving/night use. Sweeping right will switch to a simpler value-based display with extra details such as total mileage, temperature and current riding time. [gallery size="medium" link="file" ids="https://cdn.shopify.com/s/files/1/0263/8469/5395/files/ninebot-mini-review-app-night-mode.png|"] You can even tap the screen to switch to a transparent background (utilising the camera on the rear of your smartphone), presumably allowing you to 'look through' your phone at where you are going whilst reading the instruments.
  When you first start using the Mini, it is locked to a 'limited' mode, preventing you from riding it too fast before you get used to controlling it. Once the 'breaking in' period is complete you can manually re-instate this speed limit (to introduce the device to new passengers, or for use by children) under the options. When in limited mode the icon will be lit and the red 'speed limiter' on the 'speedo' readout will indicate its activation. [gallery size="medium" link="file" ids="https://cdn.shopify.com/s/files/1/0263/8469/5395/files/ninebot-mini-review-app-speed-limiting.png|"] Tapping the centre of the screen will enable the lock mode. When locked (note the padlock in the screenshots above) you cannot ride or drag the Ninebot Mini around. If you try to, or even pick it up, it will bleep away whilst a
 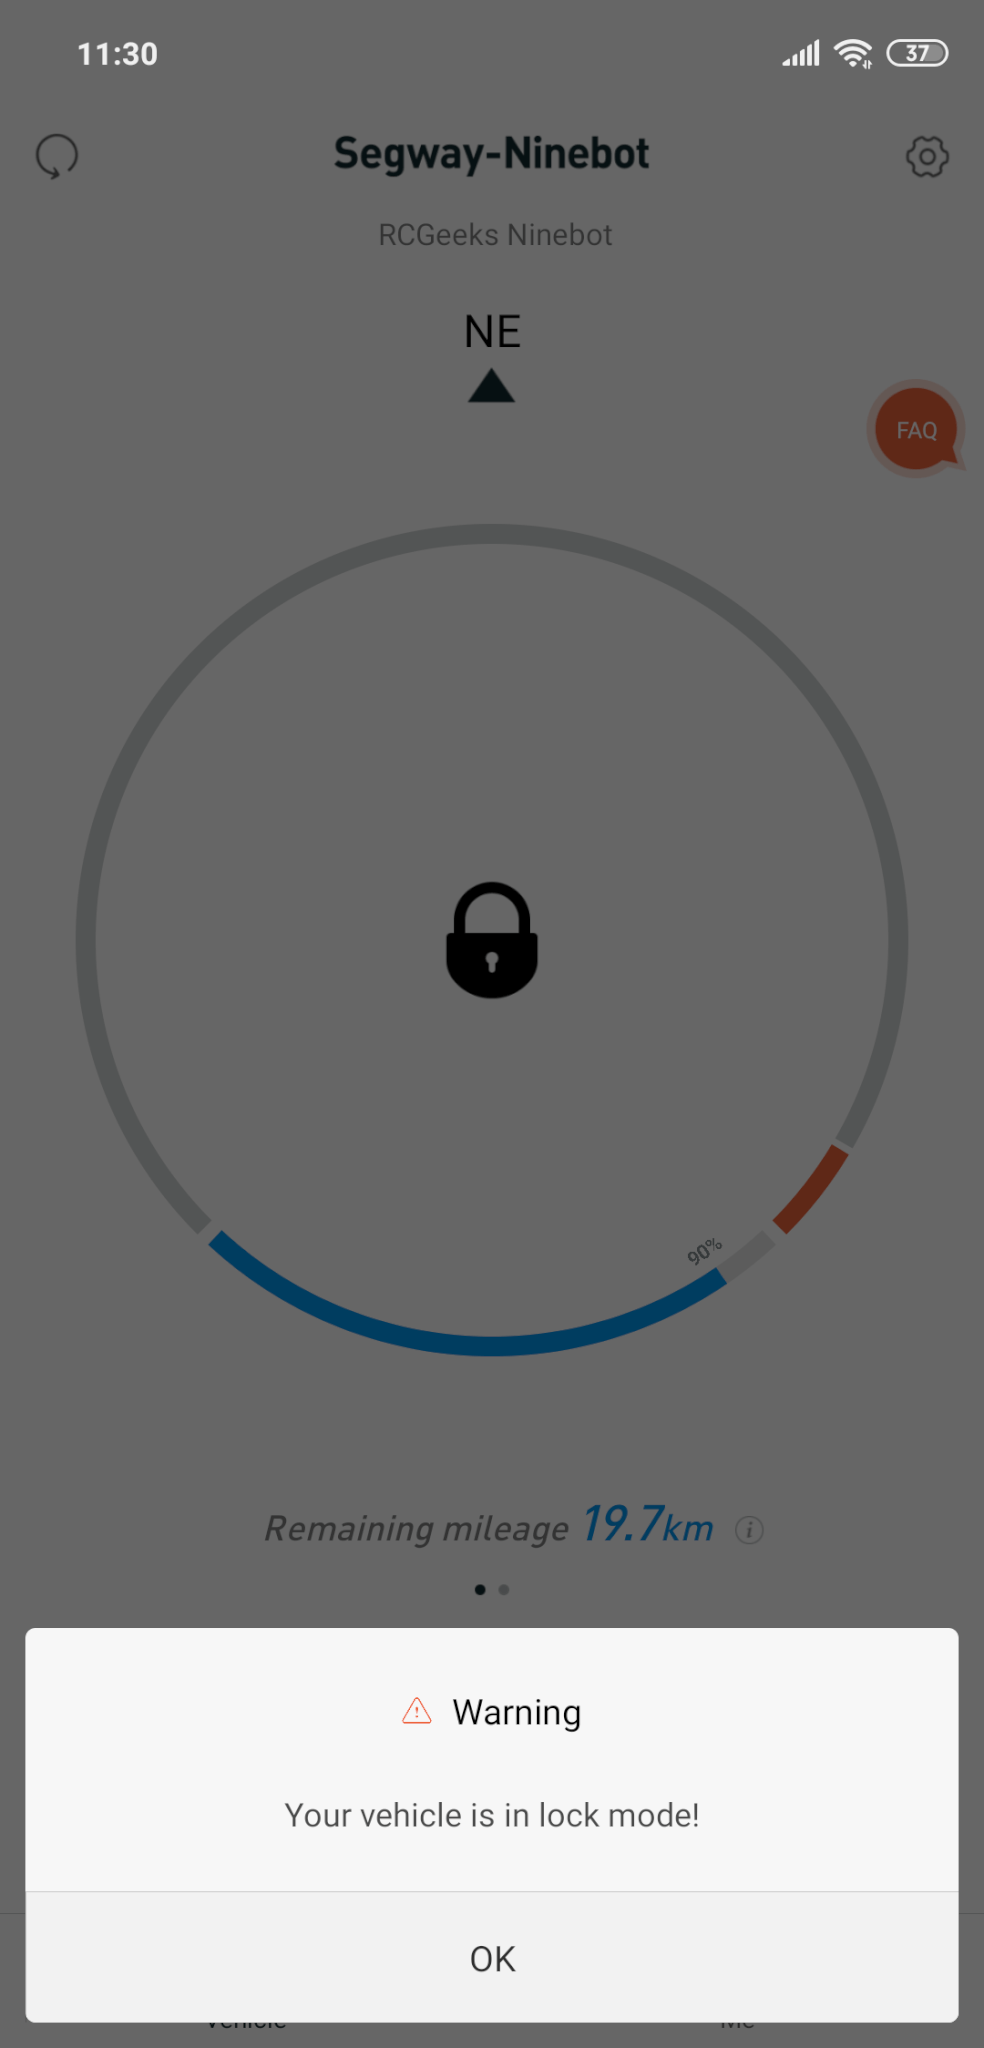 warning appears on your smartphone. Hitting the lights button will give you control over the lights on the front and rear of the Ninebot. We set ours up for dynamic breathing but you can have them set to a simpler single colour or just the brake/signal system.
  Pressing the cog in the top right of the screen will access the settings menu. Here you can update the firmware, adjust sensor and configure settings whilst learning more about the Ninebot Mini. Useful adjustments include renaming your vehicle, changing the password, swapping the units to something you are familiar with and learning more about the battery condition. [gallery columns="4" size="medium" ids="https://cdn.shopify.com/s/files/1/0263/8469/5395/files/Screenshot_2019-02-16-11-48-44-858_cn.ninebot.ninebot.png|"] Buried in the settings menus under other options is a mileage calculator. Here you can input your weight, riding style and other variables, to calculate the estimated range you could get from the Ninebot. As you can see from our calculations, even with a heavy passenger the potential range can be expanded by 23% with a smooth riding style! [gallery columns="2" size="medium" ids="https://cdn.shopify.com/s/files/1/0263/8469/5395/files/ninebot-mini-review-app-mileage-calculator-one.png|"]
 Keep an eye on the pressures and don't let them deflate, low tyre pressures will harm your range and performance. The 10.5inch tyres are tubeless and work best between 45-50 Psi, use the included adapter to inflate them as access is limited. If you do replace a tyre it can be done in situ as long as you have a quality set of tyre levers that aren't going to damage the magnesium rims.

 Across mainland Europe, commuters are already rolling to work from satellite park and ride carparks. Holiday makers have enjoyed segway tours around progressive thinking US cities and this freedom is now 'available at your toe-tips'. [gallery columns="2" link="file" size="medium" ids="https://cdn.shopify.com/s/files/1/0263/8469/5395/files/Ninebot-Mini-Review-gimbal-usage-low.jpg|"] Filmmakers are employing self balancing platforms like these in conjunction with camera gimbals to produce complex yet silky smooth dolly shots with minimal setup time!
  Closer to home we've found staff members use ours to pop to the supermarket at lunch or to zoom around the warehouse picking stock.
 Do you have any questions about the Ninebot Mini? Perhaps you know of a personal transport product you'd like to see us review? We are always interested in your suggestions so please leave them in the comments section below!
What is the Ninebot Mini?
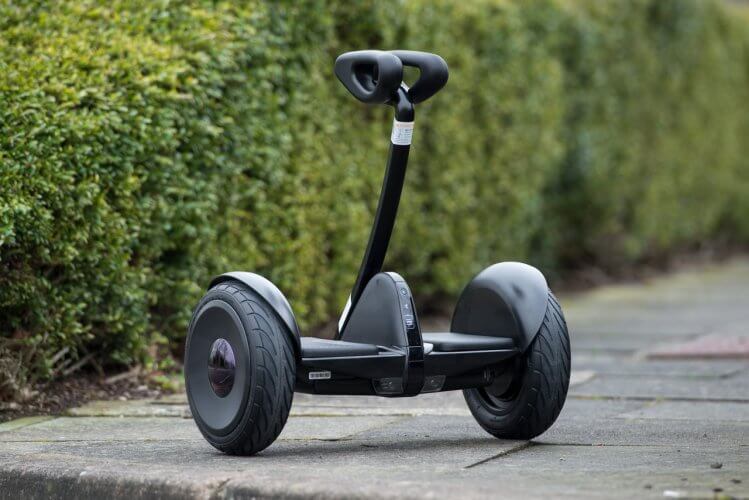
Ninebot mini is a self balancing (using segway-tech) two-wheeled platform that is controlled by leaning and weight shift. It is suitable for passengers 4 foot or above and older than 16 years of age. Depending on passenger weight it can travel up to 22km on a single charge. It can cope with a variety of terrain from tarmac to sand and stones including slopes up to 15 degrees. The lightweight magnesium construction and battery distribution allow for a natural balance and its IP54 rating its safe to travel on, even when its raining.
Ninebot Mini at a glance
- Compact (55cm wide, 26cm deep and 60cm tall), portable gyroscopically stabilised scooter
- 13.5mile/22km max range from a single charge
- 10mph/16kph top speed
- Dual motors with a total of 700w of power and 70Nm of torque
- Easy to ride (pick it up in a matter of minutes)
- Companion bluetooth smartphone app for remote control and customising settings

Unboxing the Ninebot Mini
The Ninebot Mini ships in a cardboard carton decorated with basic line art. Inside bagged and protected by polystyrene is the core of the device and its steerer tube, topped off with the accessory box. The contents include:
- Main Ninebox Mini frame
- Knee control steerer bar
- Charger including power cable
- Two hex bolts, allen key and plastic lid
- Air valve extension
- User manual, quick start guide, warranty notice

Putting the Ninebot Mini Together
You might have noticed in our unboxing photos that the mini looks a little different to how yours comes out of the box! The Mini does require minimal assembly before use. As listed on the inside flap of the packaging, you need to affix the steering bar to the chassis. [gallery size="medium" link="file" ids="https://cdn.shopify.com/s/files/1/0263/8469/5395/files/Ninebot-Mini-Review-cap-installation-fitting.jpg|"] With the chassis 'face down' slide the steering bar onto the stainless receiver on the back. Take the provided allen key, and screw the two hex bolts in. Tighten by hand before clipping the black cover over the top. [gallery link="file" size="medium" ids="https://cdn.shopify.com/s/files/1/0263/8469/5395/files/Ninebot-Mini-Review-Unboxed-rear.jpg|"]How long does it take to charge a Ninebot Mini?
The Ninebot Mini takes around 4 hours for a full charge of those thirty 18650 cells, with the included 63 Volt 2 Amp wall charger. To charge the Mini, power it down and lay it on its 'back'. On the front between the headlights you will see a small flap that hinges upwards, behind which lies the keyed four pin charge port, covered by a (retaining) rubber cap. [gallery columns="4" size="medium" link="file" ids="https://cdn.shopify.com/s/files/1/0263/8469/5395/files/Ninebot-Mini-Review-Fast-Charger.jpg|"] The led on the charging brick will switch from green to red when charging and return to green when fully charged. Also note that the display on the front of the Mini animates as the battery 'fills up'. We'd love to see manufacturers fix fast charging circuitry to devices like this but understand that temperature control and battery longevity issues perhaps limit this technology at this budget. Indeed note that the manufacturer states the device should be charged between 0° and 40° Celsius to extend the life of the battery.
What do all these symbols mean on the front?
A small display on the front of the Ninebot shows you its status. Starting from the top under the power button, is the lock indicator. When this padlock icon is lit, the Ninebot is locked (via the app) and cannot be 'driven', it will bleep and vibrate if you try to push it along or pick it up. Below that is the bluetooth indicator. This will appear solid when connected to the app and will flash when not. Below this is the speed limiter indicator (depicted by a dial icon) enabled by default when you start using the device it limits the top speed to 7km and must be 'unlocked' through continued use. This can be disabled and adjusted via the smartphone app. Lastly we have the battery indicator as seen above. Each bar of the icon represents 20% of the batteries power level. The Ninebot will reduce its top speed as the battery depletes, beeping when the power level is extremely low. If you leave the device powered on but unused for 10 minutes, or if you knock it over and leave it on the ground for 30 seconds it will power itself down to save its battery.
Ninebot Mini design features
For new riders, the steerer tube and kneepad look suspiciously like a bicycle seatpost and saddle. Don't make this mistake as it is not designed for sitting on! Whilst they are designed to connect your legs to the device, should the worst happen and you over-tilt or fall off, the soft kneepad will swing over and hit the ground preventing any damage to it or the Mini (in this case the Ninebot will also kill the motors and angrily beep at you!). The soft rubber pads of the footplate offer good grip to keep you onboard, essential when the Ninebot Mini can 'pull up' in 3.4m on dry surfaces.
  The deck containing the batteries and electronics is impressively slim meaning the Mini has 8cm ground clearance.
  Wheel guards run close to the tyres allowing you to use the Mini on wet surfaces without getting soaked by spray. The big rubber tyres providing a comfortable (if sensitive) ride.
  It has two useful headlights mounted underneath the footplate that light a good few meters ahead. These automatically come on when it gets dark, but can be over-ridden in the app. At the rear the lights can be configured to all sort of patterns including brake and turn signals (red and orange respectively). [gallery columns="2" size="medium" ids="https://cdn.shopify.com/s/files/1/0263/8469/5395/files/Ninebot-Mini-Review-headlights.jpg|"]
Riding the Ninebot Mini
To power the Ninebot Mini up, hold the steerer tube upright and press the power button on the front once. The device will power up with a confirmation beep and self balance. Make sure you have it on a completely flat surface, if not it will creep 'down' any slope. Foot position is important (aim to place your feet centrally on the pads with your arches over the axle) but confidence and commitment are the key. Place your dominant foot on the device, transfer your weight onto it whilst quickly and decisively stepping your other foot onto the platform.
  Unless you are feeling confident, we suggest having someone on hand to help you the first time you try mounting the Ninebot Mini. Have them stand to the side at the front of the device and hold your hands whilst you step on. The most common issue people have is trying to balance against the correction of the device, resulting in it rocking back and forth trying to fight against them! [gallery link="file" columns="2" size="medium" ids="https://cdn.shopify.com/s/files/1/0263/8469/5395/files/Ninebot-Mini-Review-riding-rear.jpg|"] Drive the Ninebot forward or backwards with a gentle leaning motion in that direction. This can be frightening at first, requiring some faith in the device. The further you lean the faster the Mini will travel in that direction. Should you lean too far either forward or backward and reach the maximum attack angle, the device will beep at you to warn you to back off and will actually start to tilt the footplate in the opposite direction to slow itself. [gallery columns="2" size="medium" link="file" ids="https://cdn.shopify.com/s/files/1/0263/8469/5395/files/Ninebot-Mini-Review-riding-rotating-left.jpg|"] Steer the Ninebot by leaning left or right. The perpendicular pressure on the steering tube will instruct the board to turn. The further the steerer is pushed the faster the Mini will turn, allowing tight turns or rotations on the spot. Taller riders may initially find standing with soft (slightly bent) knees can help, but we recommend relaxing and standing upright, interacting with the pads with their inner leg.
The Ninebot Mini App
Available for both iOS and Android, the Ninebot Mini companion app is required for activating the self-balancing scooter. Note that the Ninebot mini app is only compatible with Android devices with Android 4.3 or higher and iOS devices with iOS 7.0 and higher. It allows connection to the device via bluetooth. When connected, the dashboard has the direction, battery level, current speed, limit speed, remaining mileage and more are displayed. Sat as standard on a white background, there is a 'dark' skin for battery saving/night use. Sweeping right will switch to a simpler value-based display with extra details such as total mileage, temperature and current riding time. [gallery size="medium" link="file" ids="https://cdn.shopify.com/s/files/1/0263/8469/5395/files/ninebot-mini-review-app-night-mode.png|"] You can even tap the screen to switch to a transparent background (utilising the camera on the rear of your smartphone), presumably allowing you to 'look through' your phone at where you are going whilst reading the instruments.
  When you first start using the Mini, it is locked to a 'limited' mode, preventing you from riding it too fast before you get used to controlling it. Once the 'breaking in' period is complete you can manually re-instate this speed limit (to introduce the device to new passengers, or for use by children) under the options. When in limited mode the icon will be lit and the red 'speed limiter' on the 'speedo' readout will indicate its activation. [gallery size="medium" link="file" ids="https://cdn.shopify.com/s/files/1/0263/8469/5395/files/ninebot-mini-review-app-speed-limiting.png|"] Tapping the centre of the screen will enable the lock mode. When locked (note the padlock in the screenshots above) you cannot ride or drag the Ninebot Mini around. If you try to, or even pick it up, it will bleep away whilst a
  warning appears on your smartphone. Hitting the lights button will give you control over the lights on the front and rear of the Ninebot. We set ours up for dynamic breathing but you can have them set to a simpler single colour or just the brake/signal system.
  Pressing the cog in the top right of the screen will access the settings menu. Here you can update the firmware, adjust sensor and configure settings whilst learning more about the Ninebot Mini. Useful adjustments include renaming your vehicle, changing the password, swapping the units to something you are familiar with and learning more about the battery condition. [gallery columns="4" size="medium" ids="https://cdn.shopify.com/s/files/1/0263/8469/5395/files/Screenshot_2019-02-16-11-48-44-858_cn.ninebot.ninebot.png|"] Buried in the settings menus under other options is a mileage calculator. Here you can input your weight, riding style and other variables, to calculate the estimated range you could get from the Ninebot. As you can see from our calculations, even with a heavy passenger the potential range can be expanded by 23% with a smooth riding style! [gallery columns="2" size="medium" ids="https://cdn.shopify.com/s/files/1/0263/8469/5395/files/ninebot-mini-review-app-mileage-calculator-one.png|"]
Ninebot Mini remote control
You can even drive your ninebot remotely ! From the app home select bluetooth remote control and a touchpad appears. Use your finger/thumb to push the blue dot towards the edges to drive the ninebot around. There is even a max-remote-speed slider for limiting it in use. [gallery columns="2" size="medium" ids="https://cdn.shopify.com/s/files/1/0263/8469/5395/files/Ninebot-Mini-Review-self-balancing-drives-on-its-own.jpg|"] Whilst you can then use it to courier items around the office (or according to the manufacturers website, race your friends ninebot, apparently) we admit that this is pretty damn gimmicky!Ninebot Mini Maintenance
As with any lithium battery you will want to avoid running it 'down to zero'. You can leave your Ninebot unused a little over three months as long as you full charge it. Whilst it has an IP54 rating, you will want to avoid leaving it outside in the rain for extended periods and never submerge it in water. Clean the scooter with a damp cloth and mild detergent and never hose it down with a pressure washer or such. Keep an eye on the pressures and don't let them deflate, low tyre pressures will harm your range and performance. The 10.5inch tyres are tubeless and work best between 45-50 Psi, use the included adapter to inflate them as access is limited. If you do replace a tyre it can be done in situ as long as you have a quality set of tyre levers that aren't going to damage the magnesium rims.
Ninebot Mini Safety and Security
Regardless of all these features, we suggest you take your personal protection seriously when using this or any of the transport products we sell. A helmet and gloves are a good start, but if you intend to go offroad a full set of knee/elbow pads plus wrist protectors are recommended. Note that the Ninebot is not designed to be used by young children. The minimum 'height to ride' is 140cm with a minimum weight limit of 40kg.
What can you use the Ninebot Mini for?
The Ninebot mini offers fantastic value, usable range, solid reliablity, reasonable performance and a novel hands free control system. Beyond simply a lazy solution for taking the dog for a walk, what could you use one for in the real world? Across mainland Europe, commuters are already rolling to work from satellite park and ride carparks. Holiday makers have enjoyed segway tours around progressive thinking US cities and this freedom is now 'available at your toe-tips'. [gallery columns="2" link="file" size="medium" ids="https://cdn.shopify.com/s/files/1/0263/8469/5395/files/Ninebot-Mini-Review-gimbal-usage-low.jpg|"] Filmmakers are employing self balancing platforms like these in conjunction with camera gimbals to produce complex yet silky smooth dolly shots with minimal setup time!
  Closer to home we've found staff members use ours to pop to the supermarket at lunch or to zoom around the warehouse picking stock.
Should I buy a Ninebot Mini?
If any of the above ideas appeal to you (or if you just love gadgets like this) then its a resounding YES. Whilst cheap hoverboards have been around for a couple of years now, this is a undeniably a fantastic price for a robust, computationally advanced, safely designed (both battery technology and interaction) transport product!We love
- Value - Substantially cheaper than our current favourite, the Mi Electric Scooter yet retaining a premium feel
- Hands free - You can operate a camera, drink your coffee or (controversially) use your phone whilst driving along
- Size - The footprint and vertical orientation is such that it can be stored in a car foot-well or hallway without cluttering it
- Futuristic - It really feels like the future of truly personal transport
We aren't so fond of
- Weight - At 12.8kg its fine to carry up and down stairs or lift in and out of a car, beyond that it would be a struggle
- Range - Many more variables involved in maximising the range compared to the Mi Scooter
- Appearance - but mostly how silly we looked when first trying it out!

Where can I buy a Ninebot Mini?
The Ninebot Mini is available now on our webstore in black (as pictured) or in a clean white. All of our stock is based in our UK warehouse and includes free next-working-day courier delivery to mainland UK addresses, so order today and it could be with you tomorrow! Our range of Segway-Ninebot products is growing every week and you can check it out here.Alternatives to the Ninebot Mini
If the Ninebot Mini isn't for you, why not consider the Mi Electric scooter? Its arguably even easier to ride and features a longer range than the Ninebot but admittedly at a higher price. For a more traditional solution, look out for our upcoming review of the Mi Qicycle a folding motor-assisted bicycle. Do you have any questions about the Ninebot Mini? Perhaps you know of a personal transport product you'd like to see us review? We are always interested in your suggestions so please leave them in the comments section below!


